How to Integrate ReadyAPI With Zephyr Scale
ReadyAPI has inbuilt support for various test management tools. File >> Preferences will list down all integration with tools like Jira, Zephyr etc. However, at the time of writing this post, Zephyr Integration is available only with Zephyr Squad and not Zephyr Scale. If your team is using Zephyr Scale, there is no inbuilt integration. I hope this will change in future since both ReadyAPI and Zephyr Scale is owned by same company.
As of now, if you need to integrate the test execution result back to Zephyr Scale, then custom scripting has to be done. The main steps involved are below
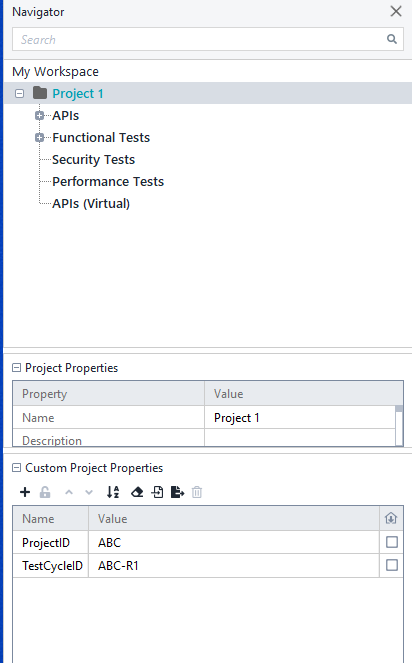
1) Define ProjectID and TestCycleID at the project level. This can be done as Custom Project Properties. Select the Project folder and enter the details in custom project properties section
2) Specify Jira Test Case ID for each test case. This can be done by custom test case properties. Create a new custom property for test case called ID and specify value as the Jira Key.
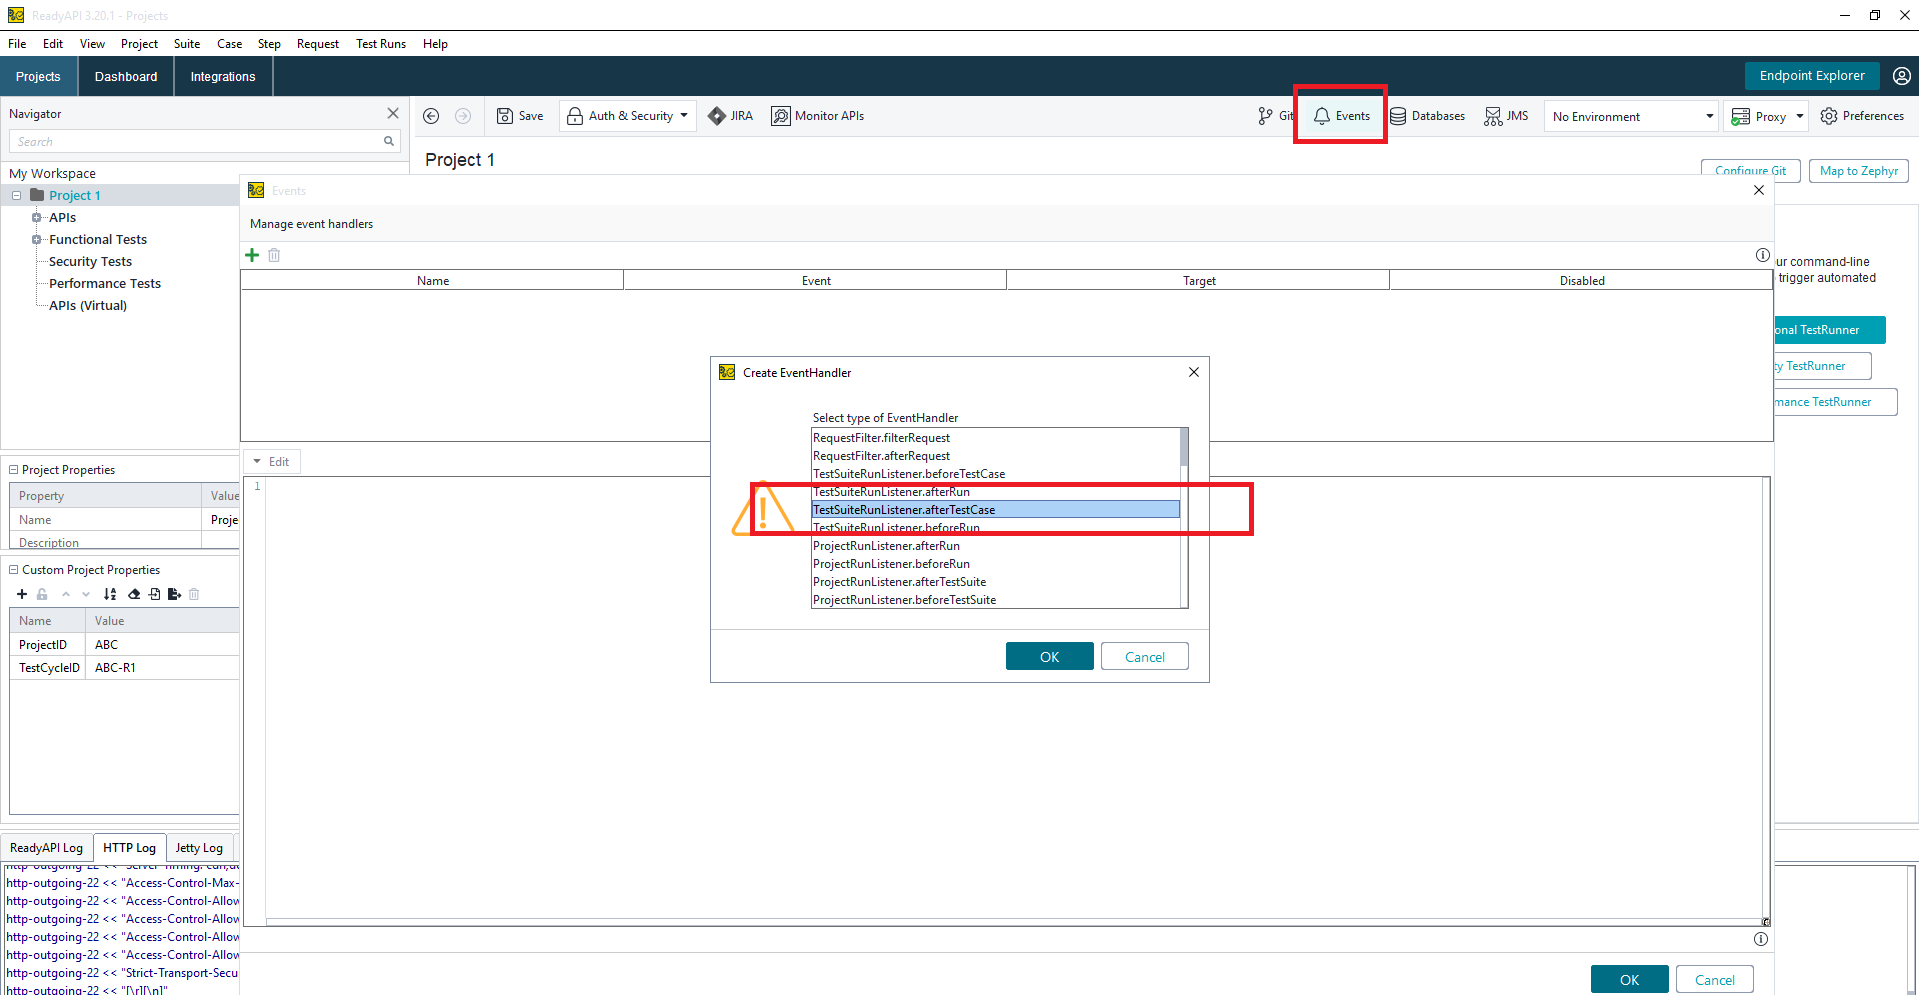
2) Add an event to run after every test case run. Click on event and select TestSuiteRunListener.afterTestcase. This will make sure that once we run a test suite, the code written in after test case will run after each test case. Please note that, it will run only if we execute test suite. Running a single test case will not trigger this.
3) Enter the below code in after test case event. It does below actions.
- Retrieve test case , test suite and project object from test runner.
- Get details like test name, jira test case id, test cycle id and project code ( as defined in step 1 & 2)
- Identify whether test case is pass or fail
- Post the result into Zephyr. This will need a token id for Zephyr , which you can create in Zephyr ( provided you have access)
Note:
- Below code updates only one step of test case. Post body content has an element called testScriptResults which is an array. If there are multiple steps, it should have more number of elements in an array . The count should match number of steps.
- Zephyr Scale API currently doesnt support adding attachment. Hence if you need to have evidence of test execution in Zephyr, it has to be done either by actualResult or comment fields.
1 2 3 4 5 6 7 8 9 10 11 12 13 14 15 16 17 18 19 20 21 22 23 24 25 26 27 28 29 30 31 32 33 34 35 36 37 38 39 40 41 42 43 44 45 46 47 48 49 50 51 52 53 54 55 56 57 58 59 60 61 62 63 64 65 66 67 68 69 70 71 72 73 74 75 76 77 78 | |
ReadyAPI_How to Use Script Assertions
In the previous blog post here and here, we saw how to create a functional test case and add assertions to validate the result. ReadyAPI provides many inbuilt assertion methods which will help to easily validate the output response without any coding. However, in real-world usage for test automation, it may not be enough. Consider the scenario where we need to validate the response content has proper values from an expected list. In this example, let us make an assertion to validate, that the status field in the response for making the order is either placed or notplaced.
Step 1:
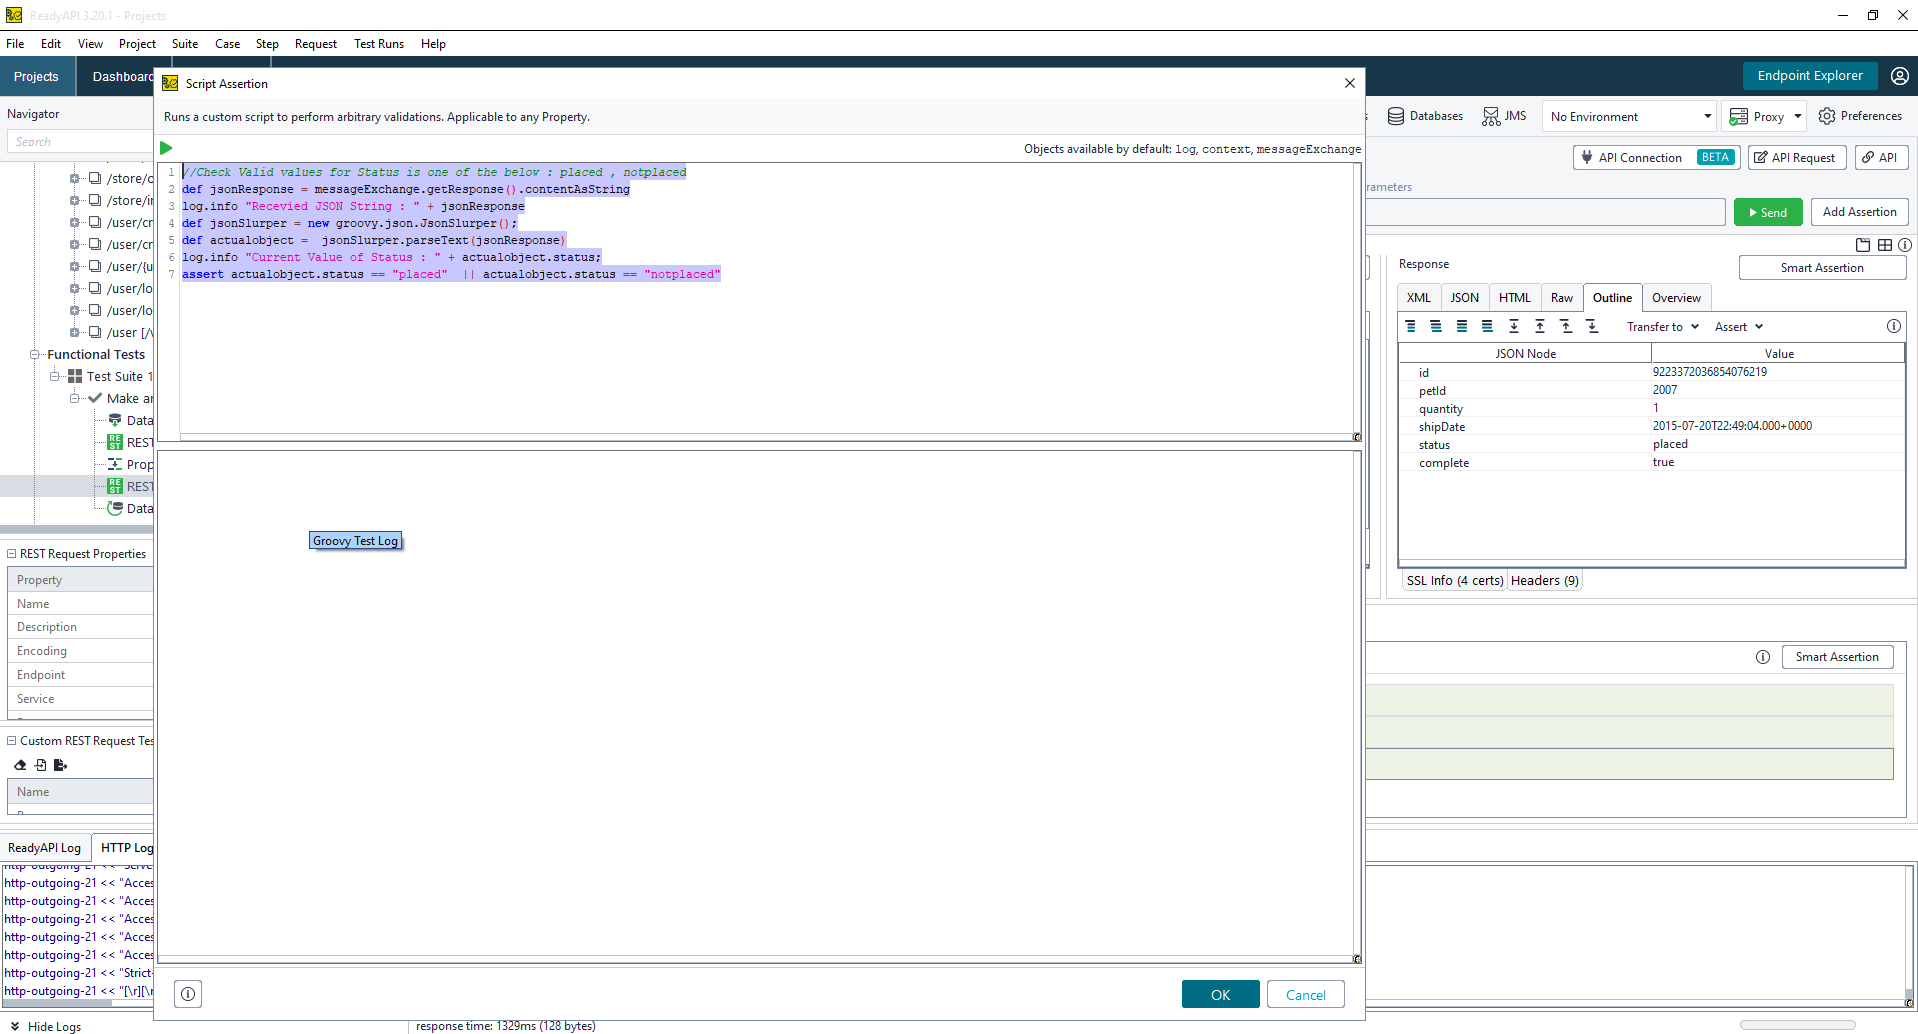
Open up the assertion tab and click on +. Select the Script assertion. This will bring up a new window to write the code. ReadyAPI supports writing code in groovy or javascript. In this example, I am using groovy scripting. This can be defined at project level properties.
1 2 3 4 5 6 7 | |
Script assertion window provides access to some default objects like log, context and message exchange. They contain information about the request and response made. Details of available methods can be found in Javadoc defined at here or in here
In the first line, we are reading the response of the current step by using the getResponse() method of messageExchange object. Once we have a string, which is in JSON format, we can use JsonSlurper to parse it into an object. JSON slurper parses text or reader content into a data structure of lists and maps Once we have an object, we can easily assert whether the value belongs to the expected list
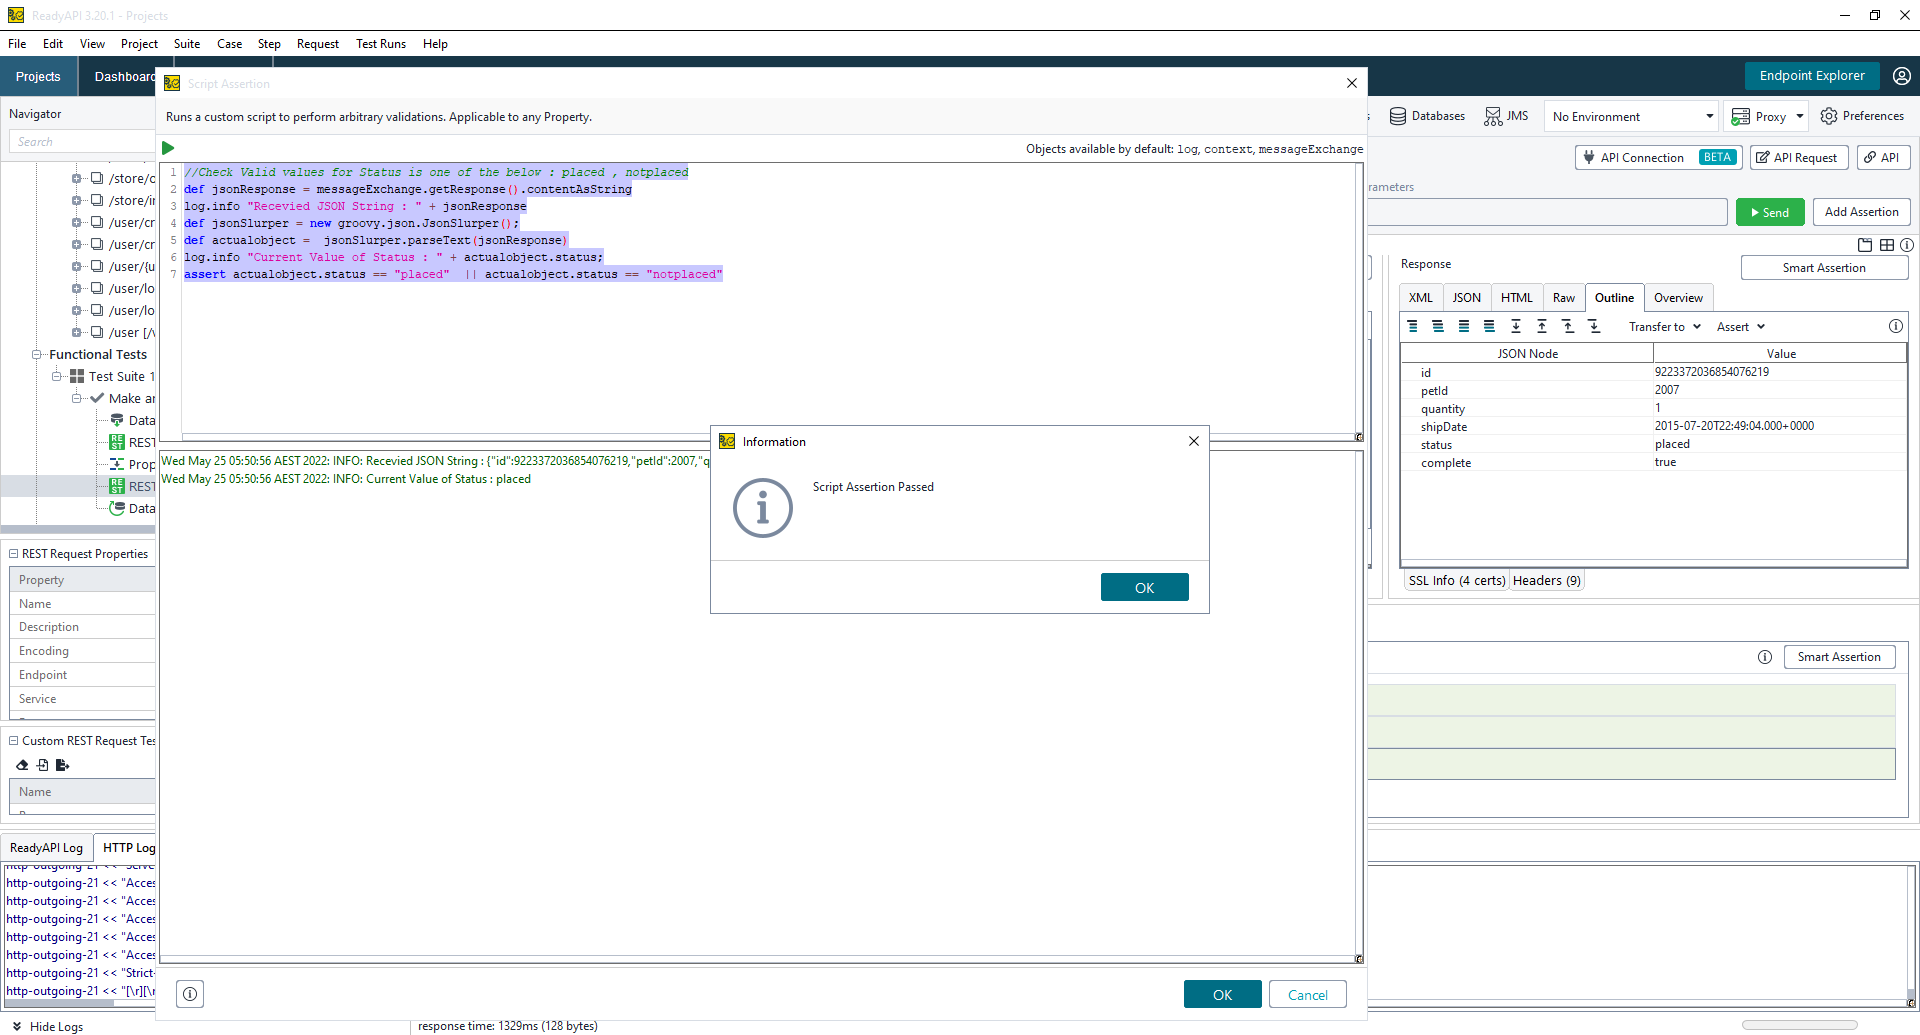
We can directly run the scripts from this editor and see output logs
Step2 :
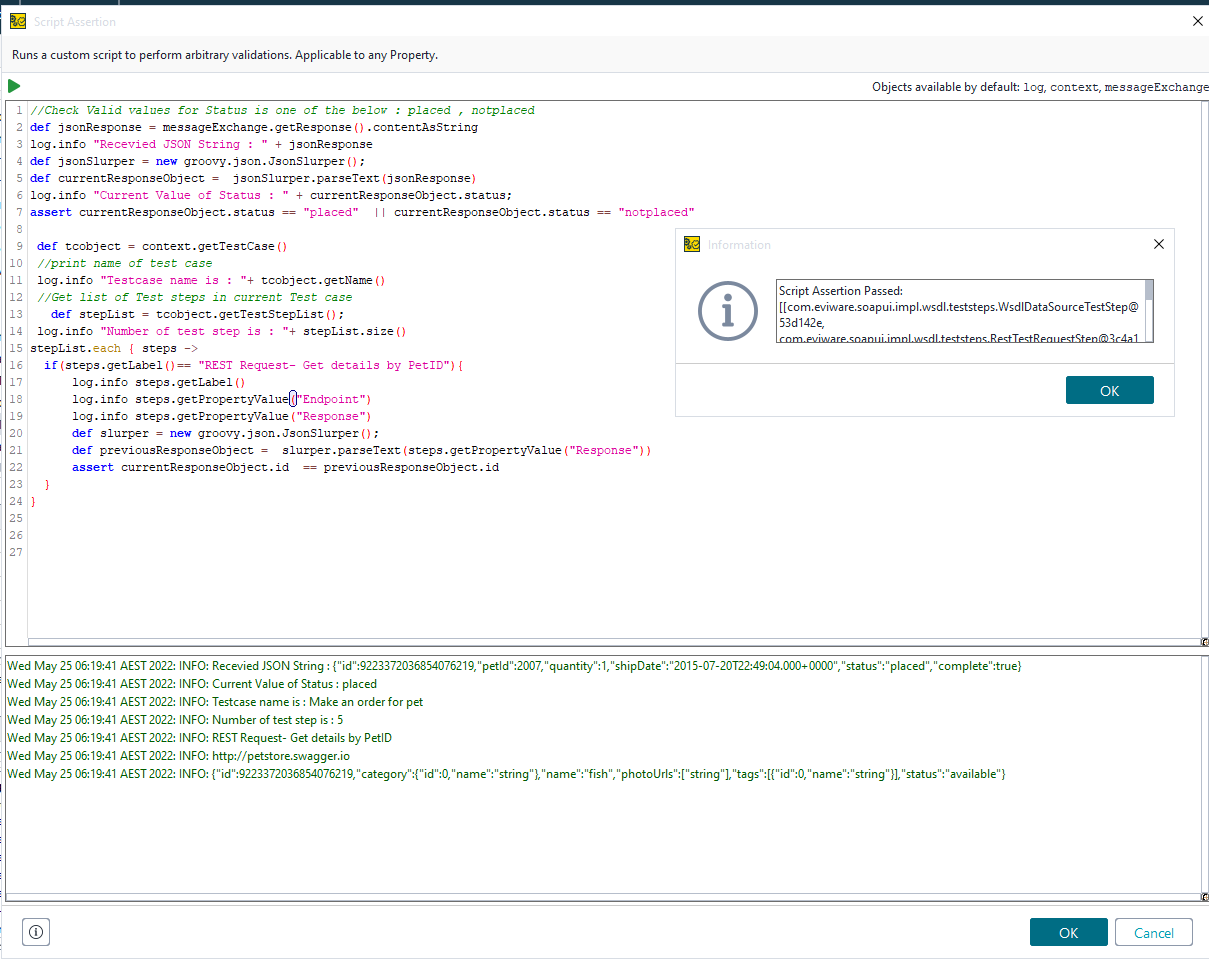
We can expand above assertion to do additional validations. If there is a need to check response from current test step against previous steps, we can make use of context object.
1 2 3 4 5 6 7 8 9 10 11 12 13 14 15 16 17 18 19 20 21 22 23 24 | |
In the above code, we are trying to compare the output of the current response with the response from the previous step. This can be achieved through Context objects. From the context object, get details of the test case object. Once we have access to the test case object, then it is easier to expand to the step list We can easily identify previous steps with a specific name and then extract its response. Parse it again to an object and then make an assertion
How to Work With XML in Groovy Scripts
ReadyAPI can be used for testing both SOAP and REST services. Output format of them is mainly XML / JSON. Hence it is important to know how to parse them into corresponding objects.
Parsing XML
Consider a scenario where output for a SOAP service or JDBC call is returning a XML containing list of person information, which we need to convert to objects.
XML format is like below, which available as a response content of a ReadyAPI Step
1 2 3 4 5 6 7 8 9 10 11 12 13 14 | |
Steps to parse them is as below.
- Create a person object
- User XMLSlurper to parse the response content to XML document
- Iterate over the rows and create an object and add to a list
1 2 3 4 5 6 7 8 9 10 11 12 13 14 15 16 17 18 19 20 21 | |
How to Make Full Use of readyAPI Features
In my previous post here, I mentioned how to do a basic functional test. Sometimes, we might have to do complex flows where we need to call multiple APIs and also iterate the tests with various sets of data.
Let us look at one scenario, which involves the below steps.
1) Get details of pet based on PetID
2) If the pet details are retrieved, place an order
3) Iterate the above scenario for different Pet ID
Let us look at how we can implement this
Step 1:
Get Details of Pet based on Pet ID. A glance of API functions in ready API or at the swagger link shows that there is an API endpoint to retrieve details of Pets based on pet ID. So let us get started
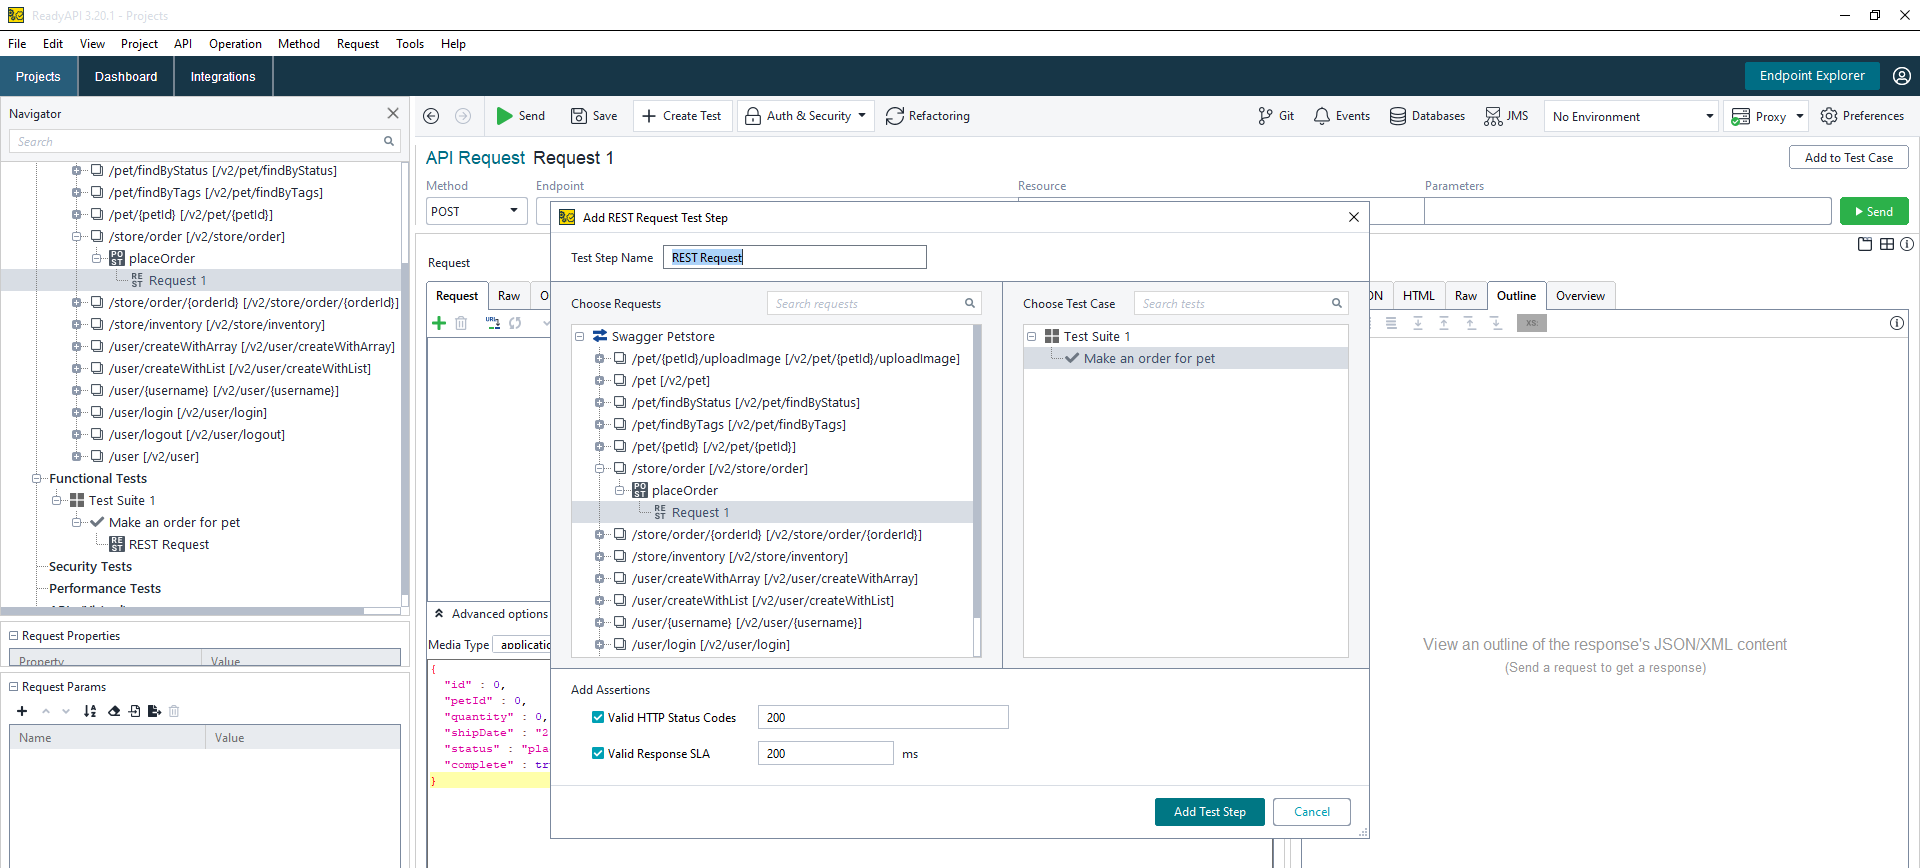
Create a new test case in ready API and add the API request to it. This can be done by first navigating to APIs >>SwaggerPetStore>>/pet/{petID}>>getPetByID and right-click on the request and add to test case.
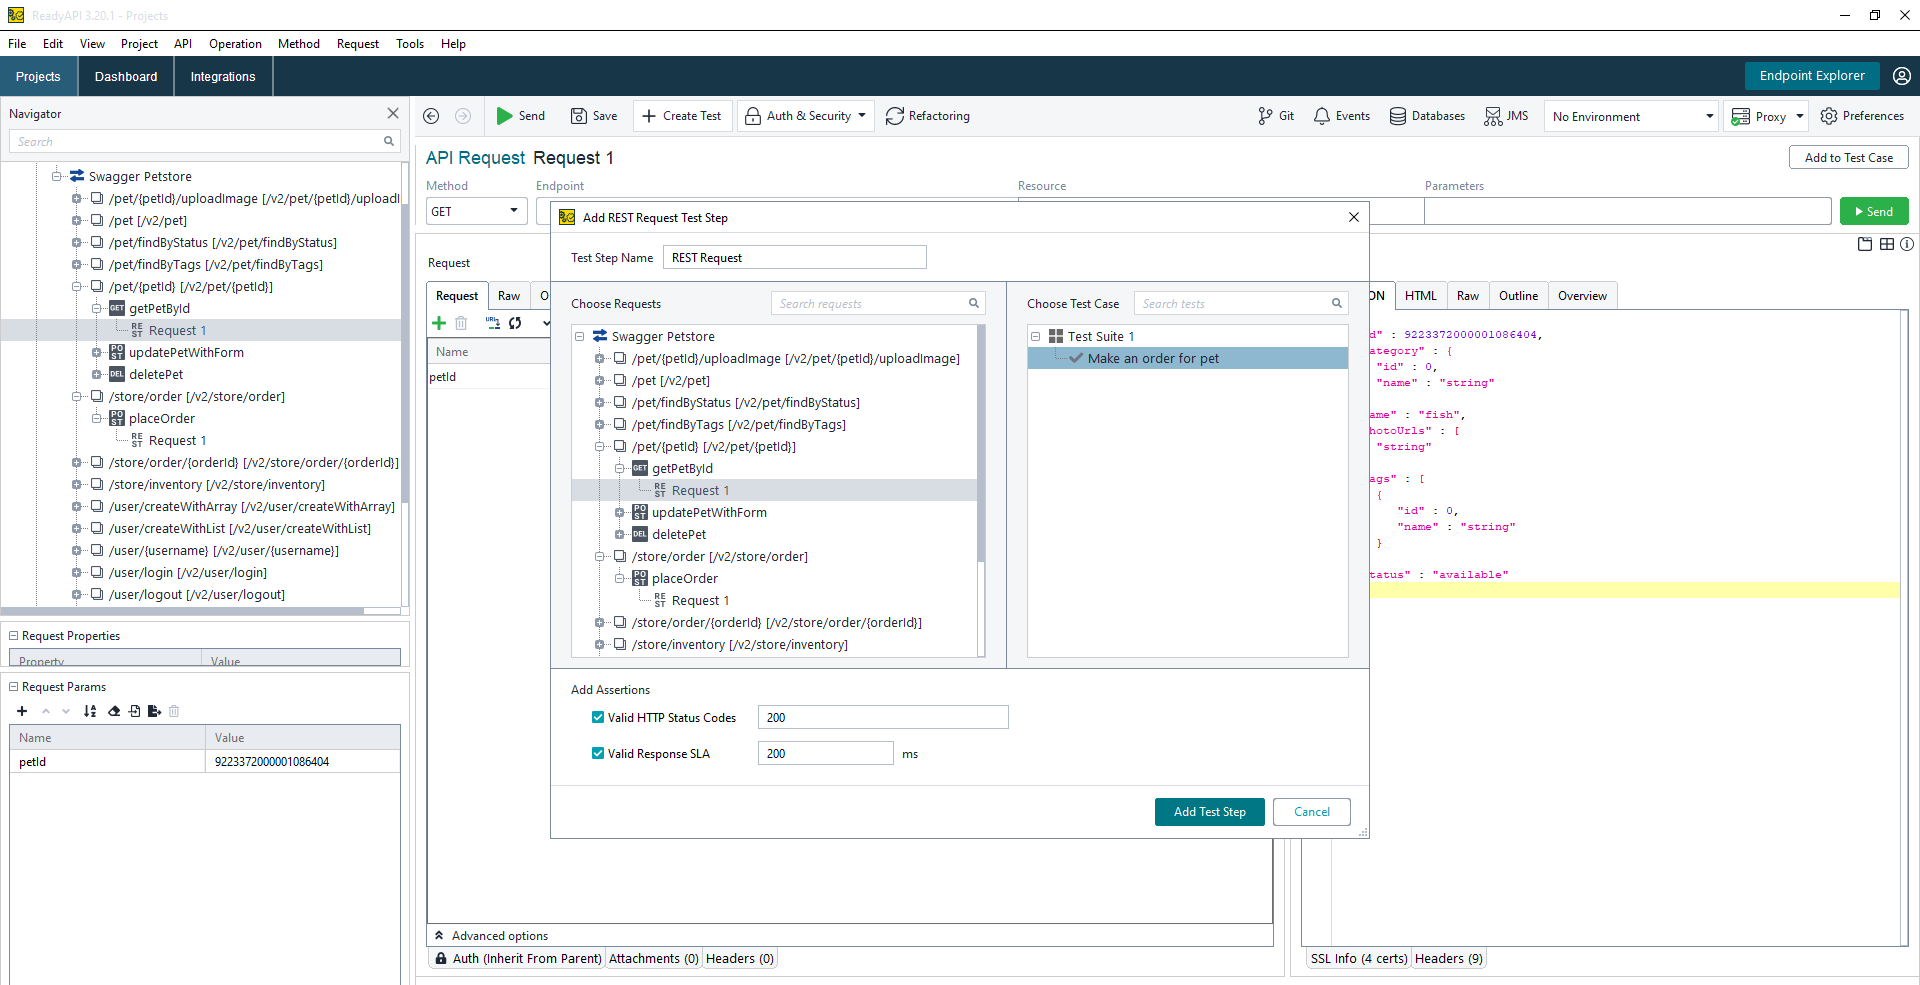
Now add the second API request to make an order. The API can be found at APIs >>SwaggerPetStore>>/store/order>>placeorder, right-click on the request and add to the test case.
Step 2:
Look at the test case now and rename the tests to reflect what each request is doing. This can be done by right-clicking on the request and selecting rename option

Step 3:
Test out already added requests. For the first request, enter a pet ID and test. Repeat the same for the Place order. Place order is a POST call and it needs a few inputs like PetID, quantity etc. Manually fill in this step for now and test it. We will look at how to transfer the details from one API to another later.
Step 4:
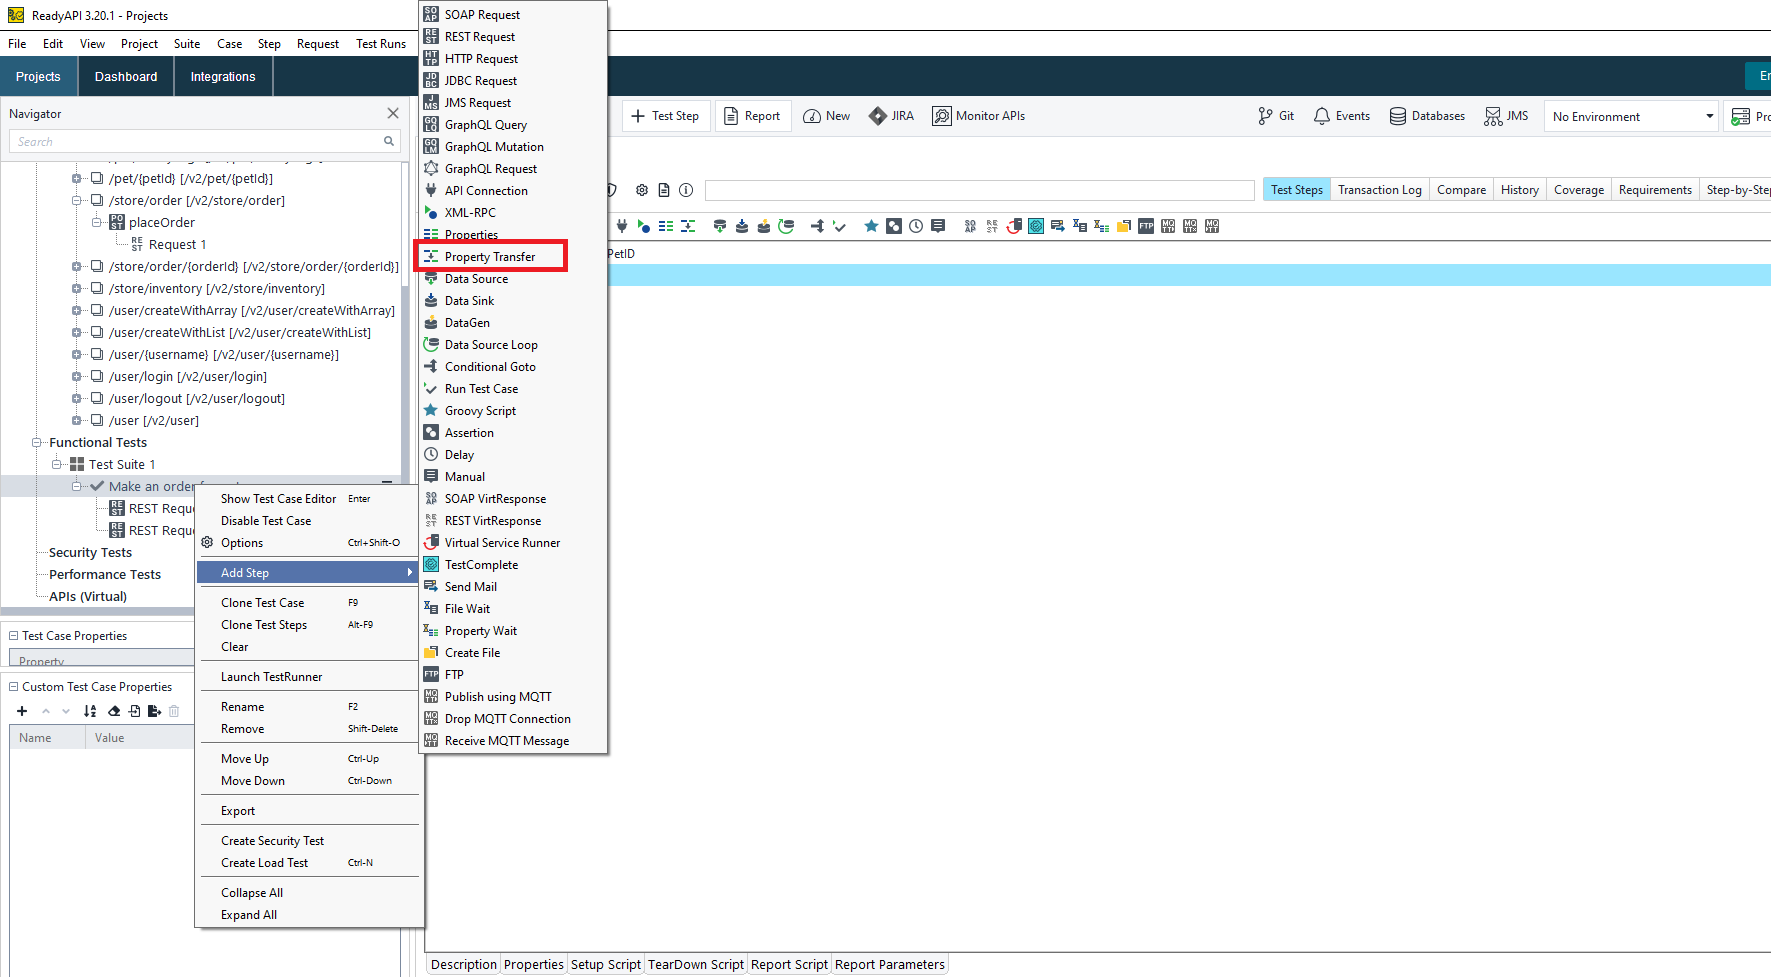
To make an order for a pet, we need to pass details from one step to another. This can be achieved by using the property Transfer step. Right-click on test case name and select Add Steps and select Property Transfer
By default, it adds a new test step at the end. Drag it to between the previous steps. Select the property transfer step and click on the + button and give a name for the value we need to pass between API requests. Let us start with PetId. ReadyAPI will automatically select the source and target steps. In this example, we need to transfer the pet id from the response of get details By PetID to the request to Place order Since the request and response is JSON, we can select JSONPath as the path language. We can then either manual key in JsonPath or use the icon to select the values

If we run the test now, it will both test and do the property transfer
Step 5:
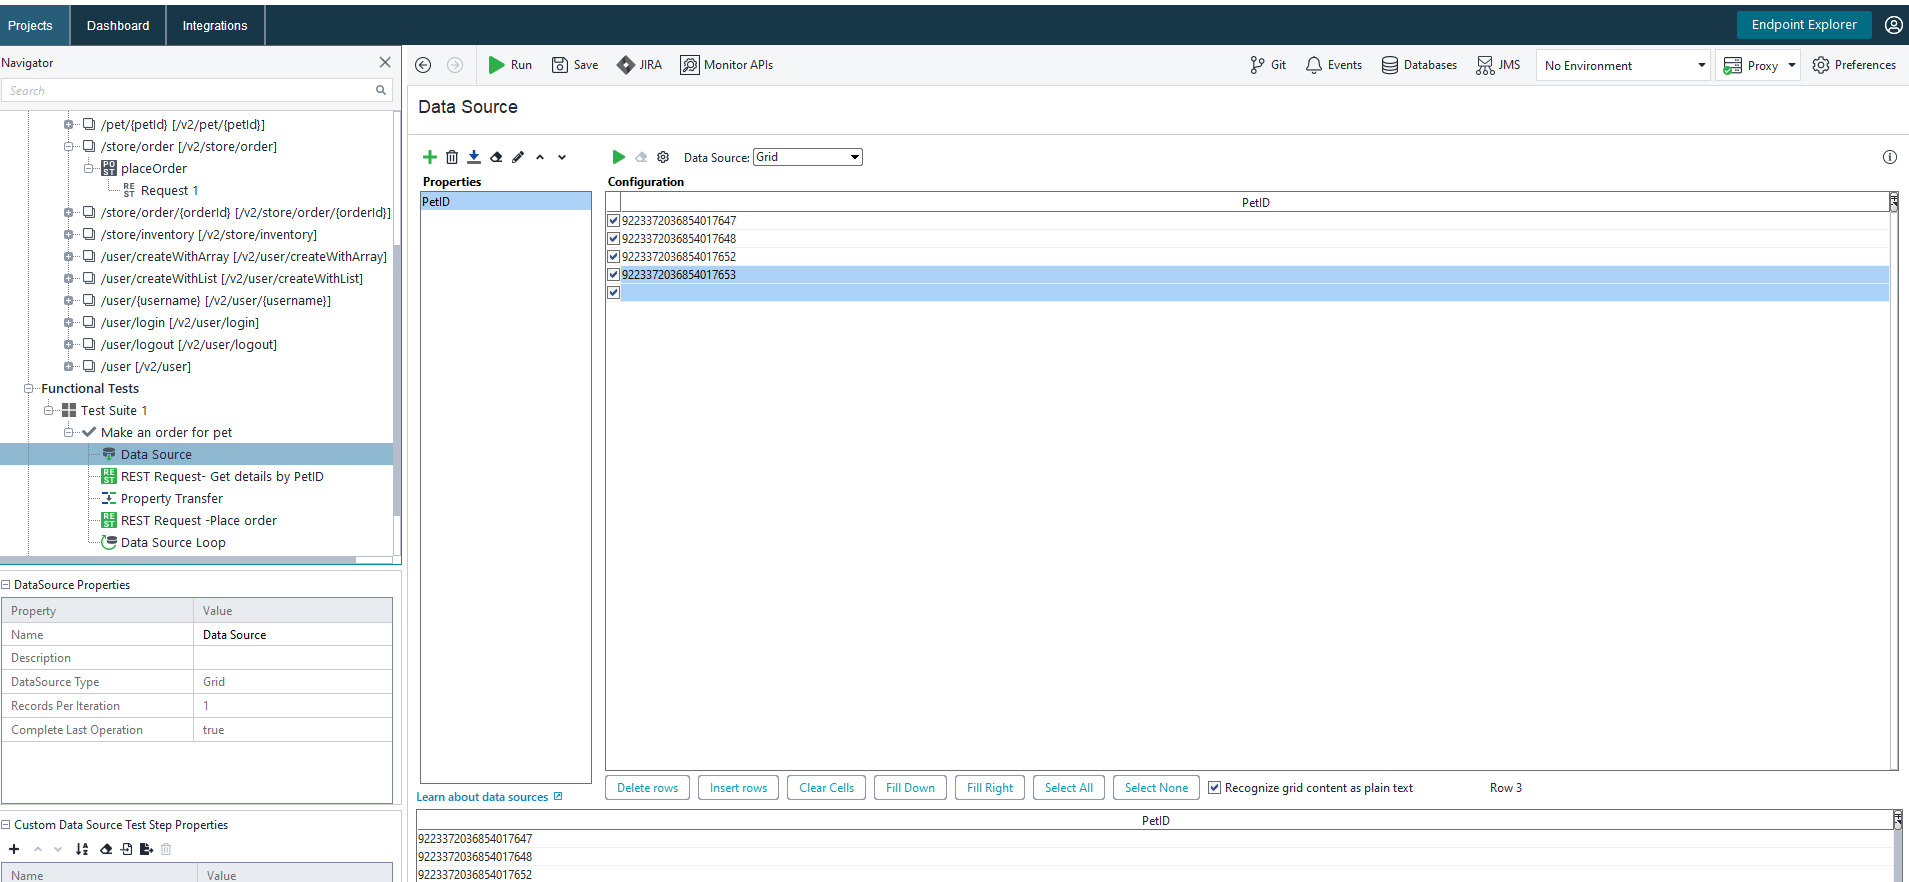
To iterate the test across various data sources, DataSource & DataSourceLoop test steps should be used. Right-click on the test case name and select Add Steps and select DataSource and DataSourceLoop. Rearrange the test steps in such a way that Datasource is the first step and Datasource loop is the last step
Select Datasource and select source type as Grid. It also supports multiple other options like JSON, Excel, XML, JDBC connection, and even a data generator. For simplicity let us use Grid
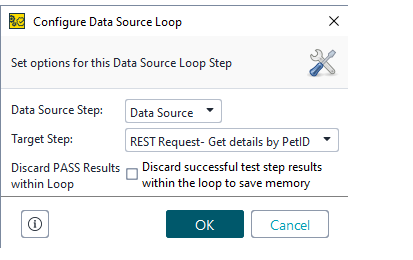
Select Datasource loop . It will ask to select the data source and target step. Make sure to unselect the check box so that details of passed test cases are also saved
Step 6:
Run the test case by selecting the test case and clicking on the green Run button. This will trigger the test using all specified data sources. Details of the test can be found in Transaction log
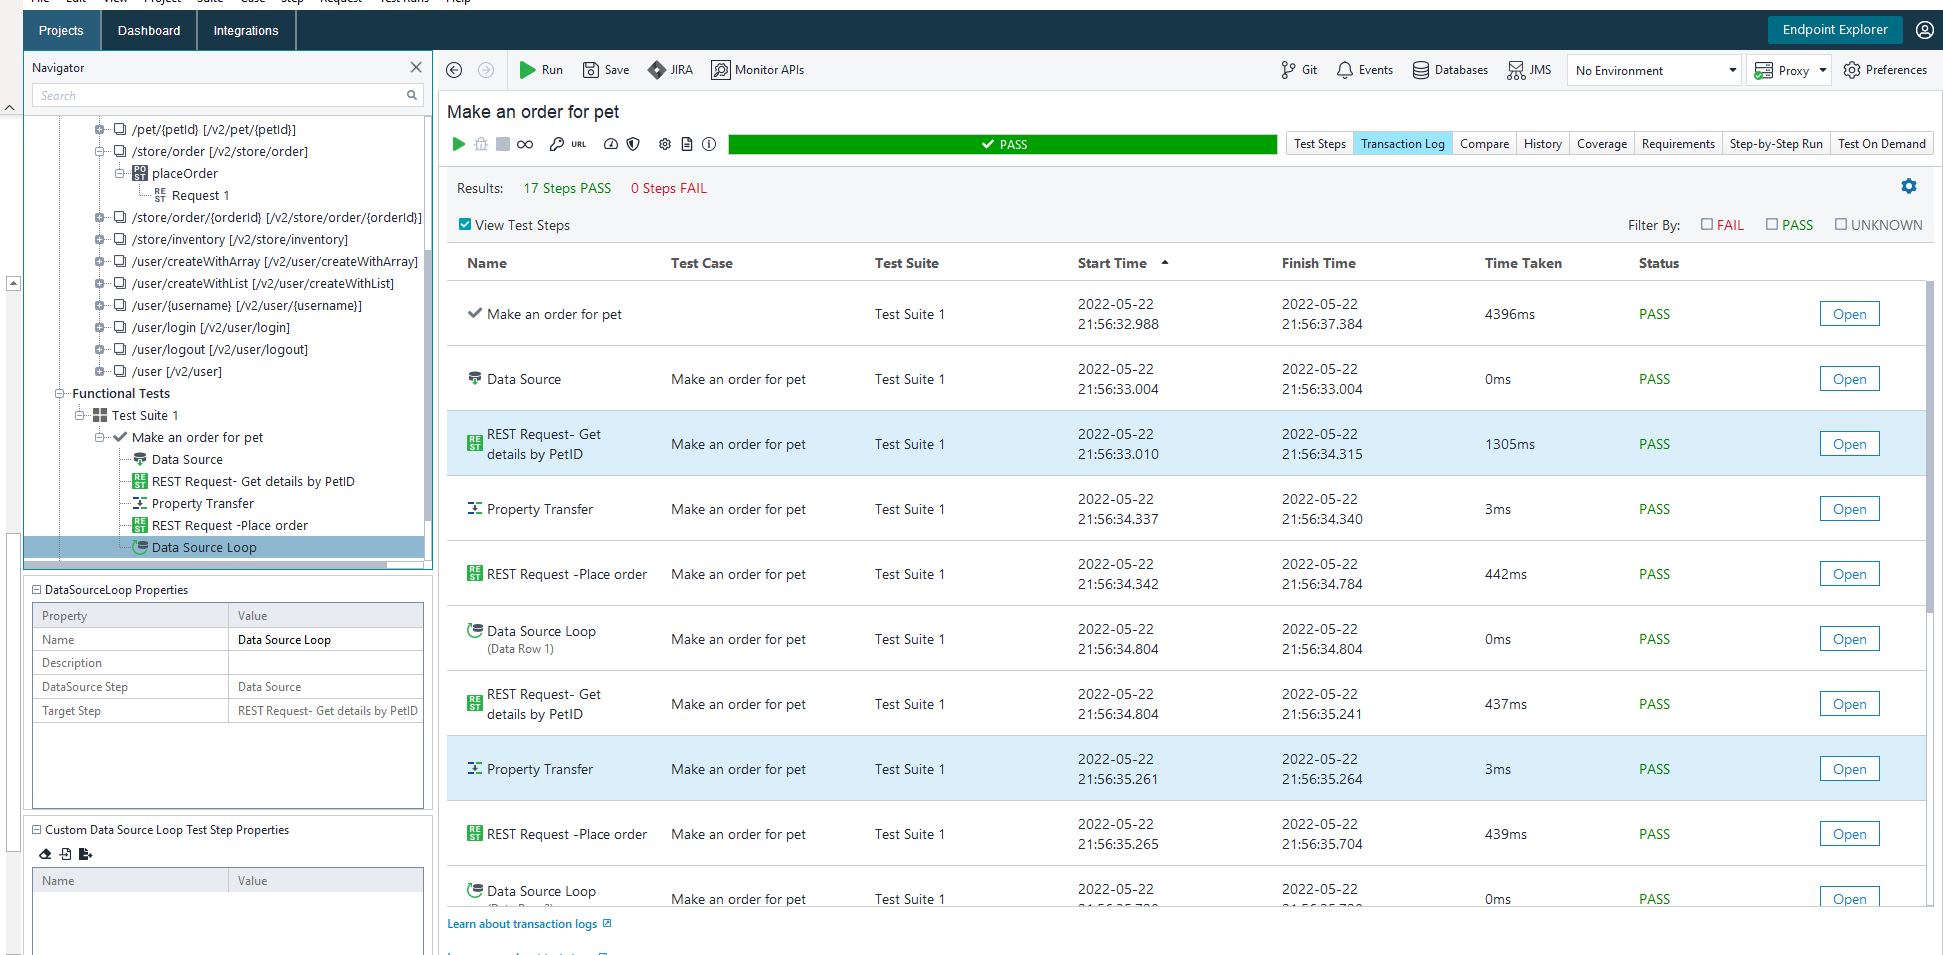
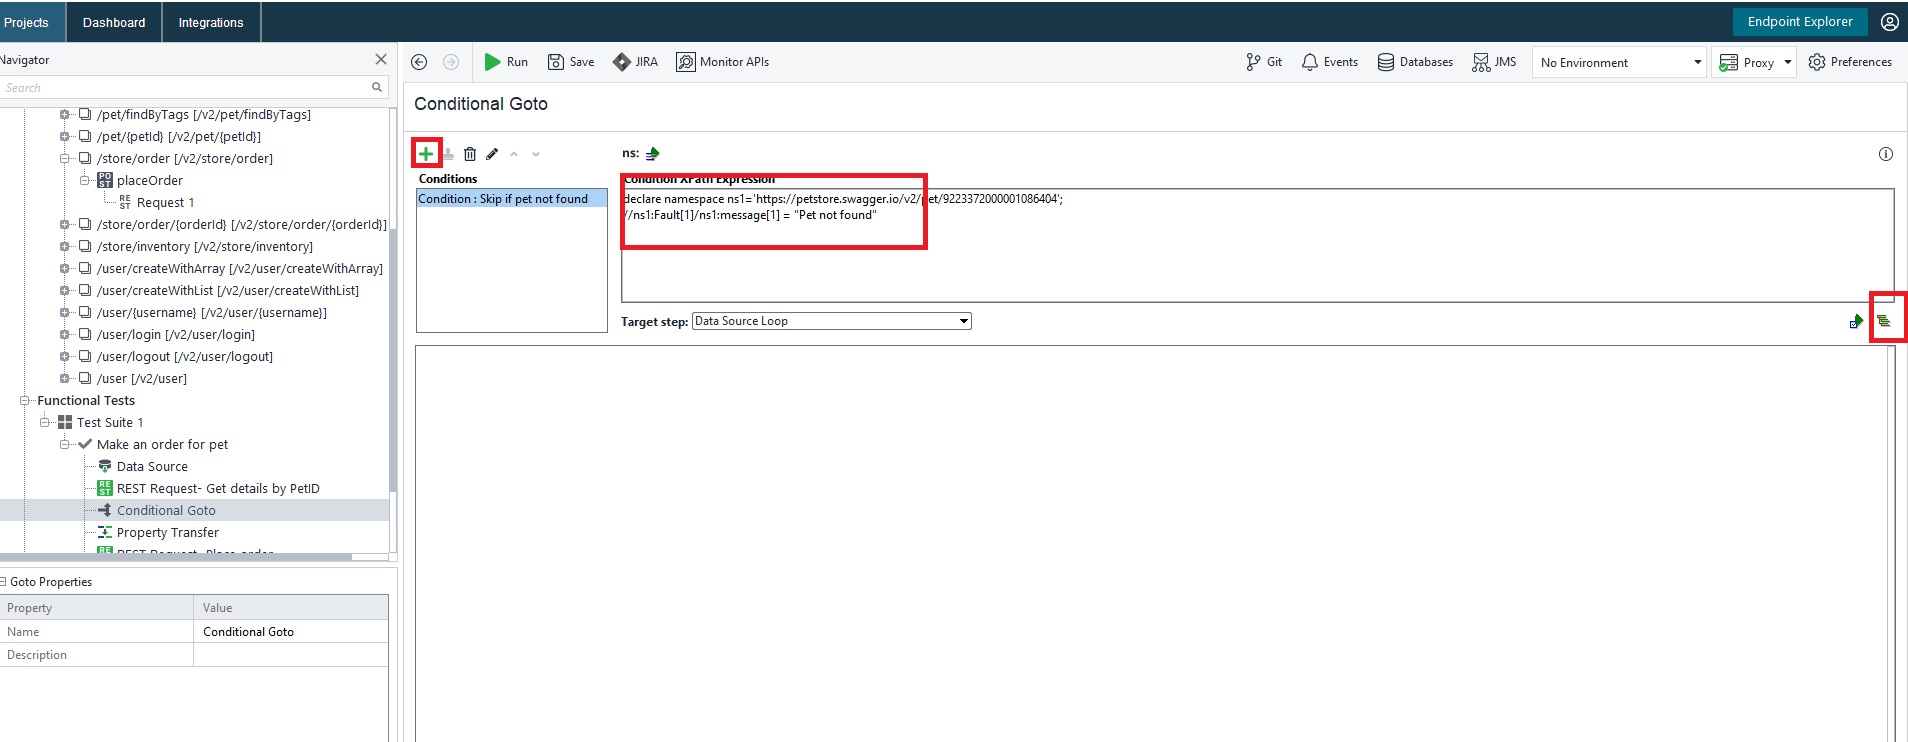
Step 7:
If we need to make an order only if pets are available, it can be done by using the Conditional Go to Test step. Add a conditional Go To Test step and select details like below. Make sure to manually add the conditions as highlighted below
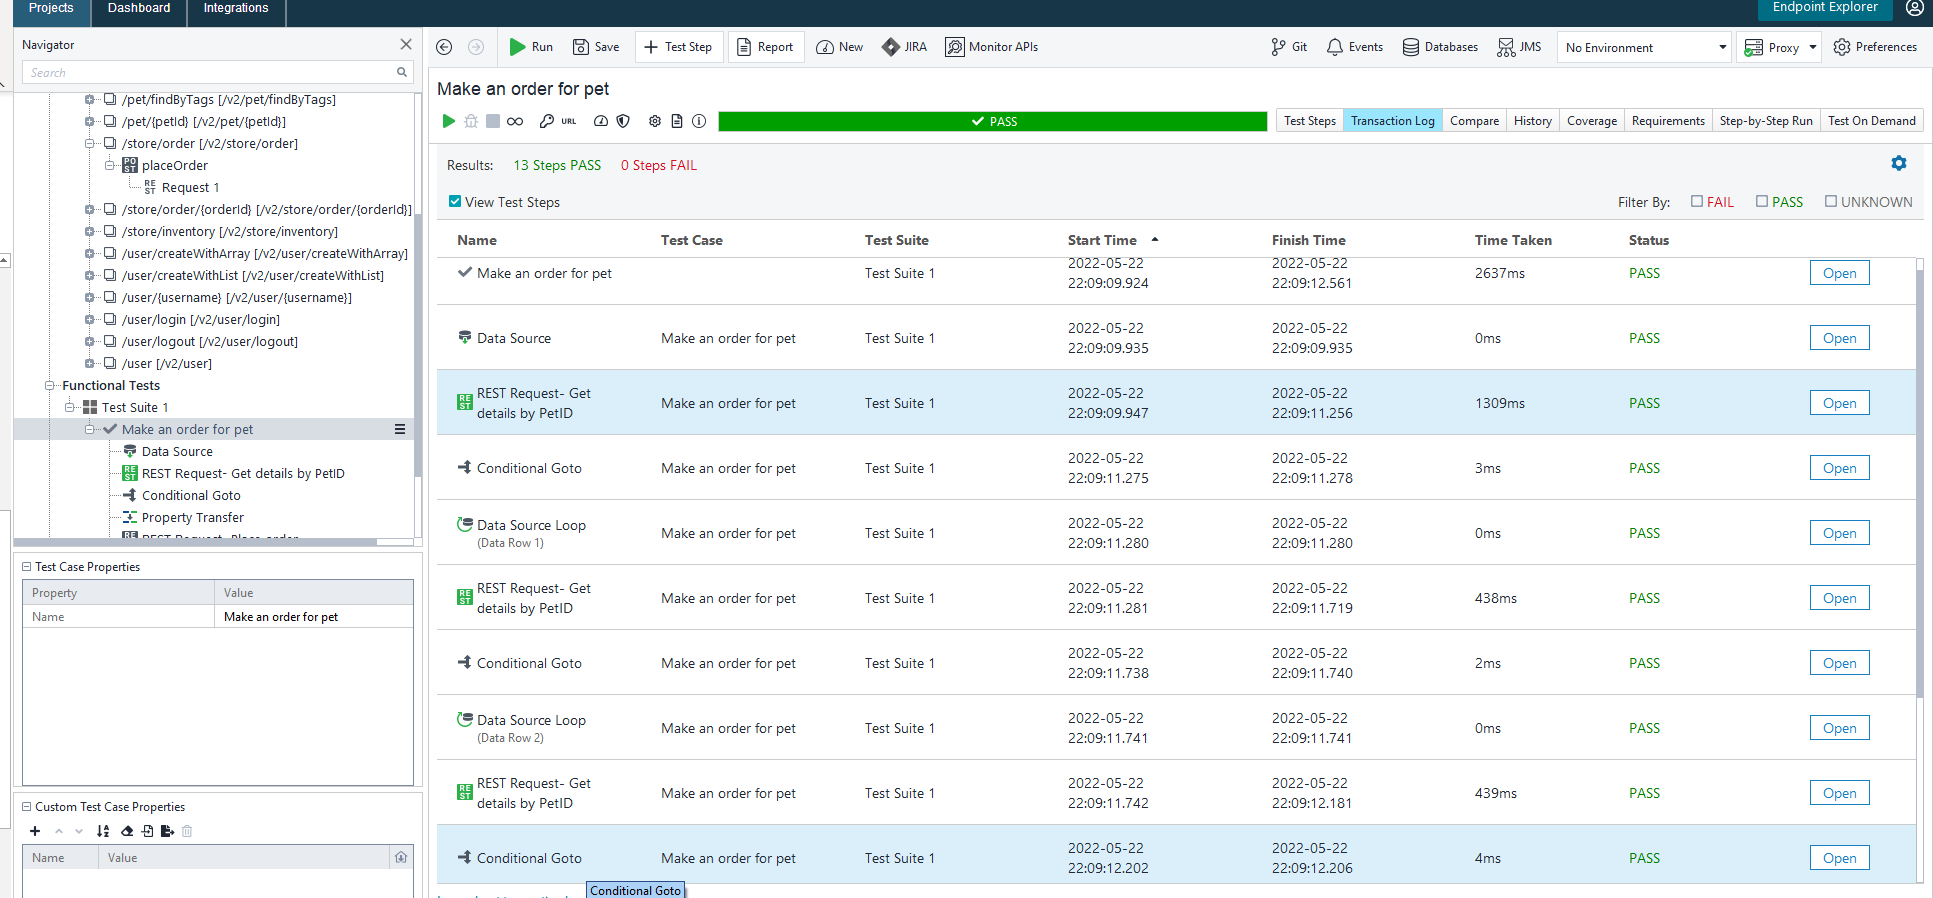
Step 8:
From the results, we can see that the property transfer is not executed.
Getting Started With ReadyAPI
Ready API is the rebranded SOAPUI Pro, which can be used for testing both SOAP services and REST services. This is a licensed tool , which offer 14 days free trial for all features. ReadyAPI provides lot for upgrades compared to free open source SoapUI . Major advantages to support functional testing of REST APIs are dynamic data sources, assertion groups, scripting , advanced property transfer etc. Full list of differences between ReadyAPI and Soap UI can be found here .
Below blog post , shows step by step process to do basic REST API test.
- Start a new project :
This can be done via FILE >> New Empty Project . Once the project is created, save it somewhere.
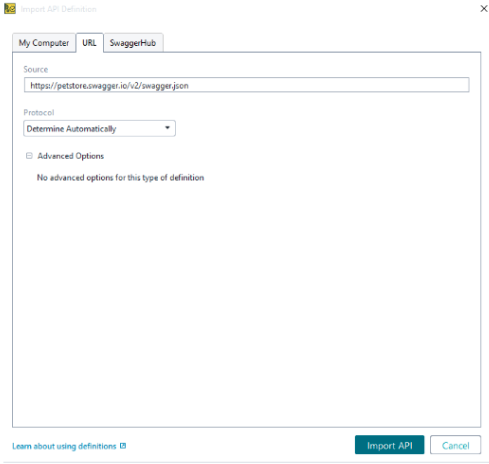
- Import API Definition:
For this tutorial, I am using the petstore API . The json file with specs is available at https://petstore.swagger.io/v2/swagger.json . In order to import, right click on API folder in ReadyAPI project and select Import API Definition. It provides different tabs on the popup. Select URL tab and paste the json path. Click Import API.
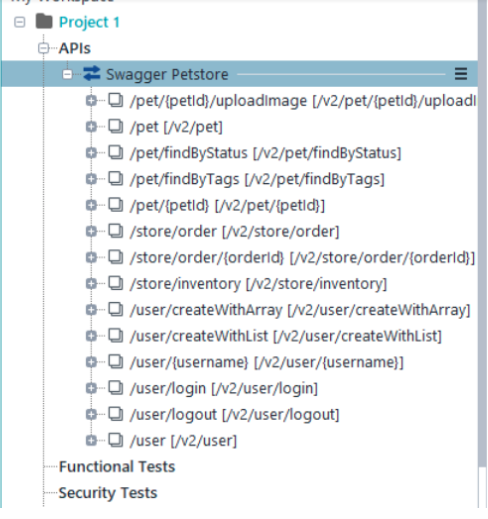
As you can see , it list out all available methods . We can expand the drop down and reach the request . Fill in required details and execute this. For eg: if we need to need to execute findPetsByStatus, we can navigate to that , fill in a valid Status and click Send.
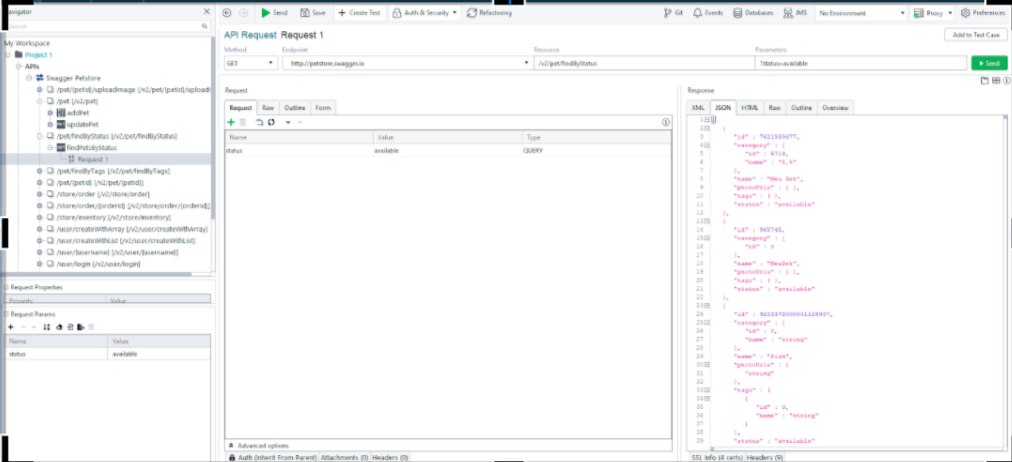
Note: If we need to add authorisations, it can be done in “Auth” tab. Details of Header can be specified in Header tab.
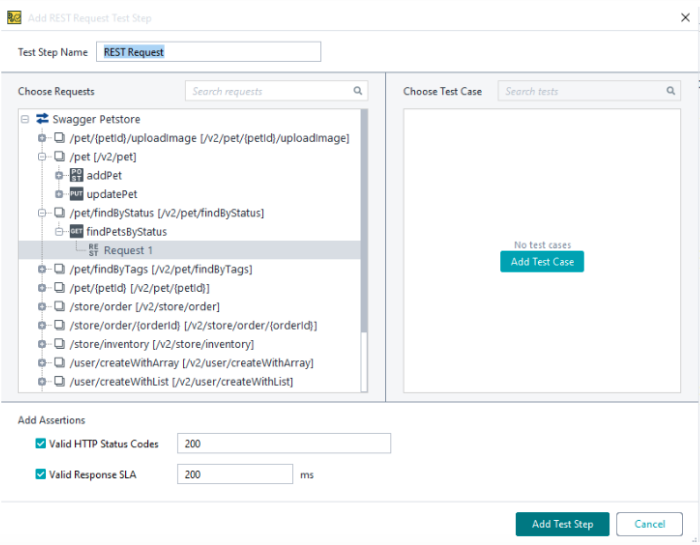
- Now let us see how we can create a test cases for this. Right click on the request and select Add to test case. This will show a new popup where we can select existing test case or create a new one. It also provides 2 basic assertions to be added. One assertion is to check response status code is 200 and other one is to check response time is within 200 millisecond.
After adding test case, it will look like below. Test cases are added under Functional Tests folder.

Run the test by clicking Send Button . We can also run the test by selecting the Testcase folder or test suite folder and clicking on Run . As a rule of thumb, it runs all request coming under that folder. For eg, running a test suite runs all test cases under it . Running a test case run, all steps under it.
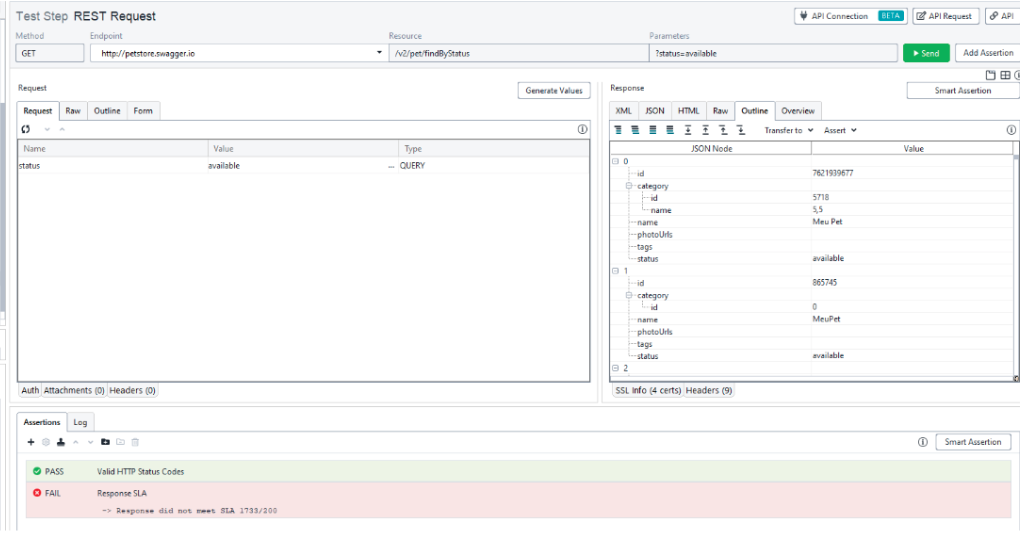
Above shows that we received a response and one assertion failed. The response time was 1733 millisecond instead of expected 200.
- Any test automation is only as good as the assertions added to it. Let us look in detail about the steps to add assertions. Click on the + button on assertions tab. That will provide a list of possible assertion
Smart Assertion : This is a new feature which allows to automatically assert on all received data and meta data. It allows to selectively ignore few data and also to make assertion case insensitive if needed. Use this assertion with caution since it is heavily depended on server returning same json response everytime ( including order, timestamp etc).If there is a possibility for data to be added/ deleted/modified, then it is better to avoid this assertion to reduce flaky test cases.
JSONPathcount : This allows to do validation on count of data returned.

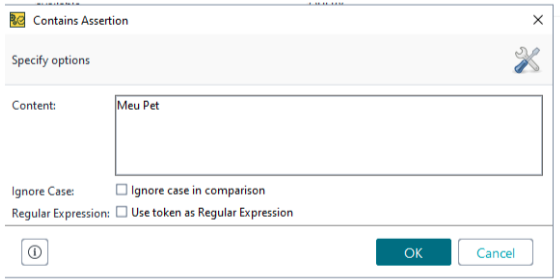
Contains : This allows to check the response content has a string we specify.
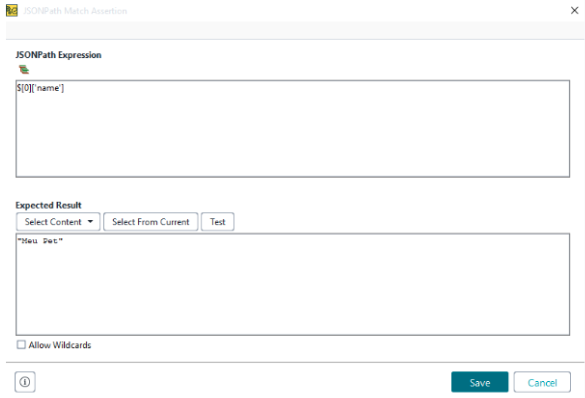
JSONPath Match assertion : This allows to check specific fields in JSON response. There is an icon which allows to select the field to validate and create JSON Path automatically.
Script Assertion : This can be used for complex assertions which is not available readily from ReadyAPI. I will create another blog post for the same
Dynamically Create Instance of a Type on Run Time Using Reflection in C#
Reflection is the process of describing the metadata of types, methods and fields in a code. It helps to get information about loaded assemblies and elements within it like classes, methods etc. According to microsoft documentation, Reflection provides objects (of type Type) that describe assemblies, modules, and types. You can use reflection to dynamically create an instance of a type, bind the type to an existing object, or get the type from an existing object and invoke its methods or access its fields and properties. If you are using attributes in your code, reflection enables you to access them.
While creating test automation framework, we will come across scenarios where we need to create instance of an objects on run time, need to examine and instantiate types in an assembly, access attributes etc. One of the common usecase is when we create a generic framework, which will allow users to specify class name in feature files and handle it without doing any further modification. Let us look at how we can achieve those.
Examples of Reflection
How to get Type of an object
1 2 3 4 | |
This will print System.String
How to get Details loaded assembly
1 2 3 | |
This will print System.Private.CoreLib, Version=4.0.0.0, Culture=neutral
How to create instance of a Class
Creating an instance of inbuilt class can be done like below.
1 2 | |
Creating an instance of custom class is a multistep process
1 2 3 4 5 6 7 | |
Activator.CreateInstance has detailed explanation of various constructors here
How to call a method from created instance
1 2 3 4 5 6 7 8 9 10 11 12 13 14 15 16 17 | |
Seeing this in an example will help to make our understanding clear.
- Create SimpleCalculatorClass as below
1 2 3 4 5 6 7 8 9 10 11 12 13 14 15 | |
- Use reflection to create an instance of above calculator class
We will start with creating a class Handle by passing full name of teh class. Then we get details of Add method. Then we call Add method by passing parameters as an object array. It will return the value as defined in the class
1 2 3 4 5 6 7 8 9 10 11 | |
Data Driven Testing in Cypress Using Fixtures
In the previous post here we saw how to read external files in Cypress using cy.readFile. Cypress also provides another way to read files. In this post, I will show how to Fixtures to do data driven testing in Cypress.
Syntax
According to documentation, syntax is as below.
1 2 3 4 | |
Comparison with cy.readFile
Main difference between cy.readFile and cy.Fixture is that former one starts looking for the files from project root folder and later looks for files under Fixture folder. cy.Fixture supports a wide range of file types/extensions like json, txt, html,jpeg,gif,png etc. If file name is not specified it looks for all supported filetypes in specific order starting with JSON. We can even assign alias to this , which will help to reuse this later on.
Example
To demonstrate this, let’s revisit old example of logging into SauceDemo website. This time, instead of using hardcoded values in feature file, I will move credentials into a separate JSON file and keep it inside Fixtures\TestDataFiles folder . File should look like below. This has two set of login credentials.
1 2 3 4 5 6 7 8 9 10 11 12 13 | |
Feature File
Create a new scenario to login to ECommerce site by using Fixtures. In below scenario we just specify type of User which we need to use for this scenario. I am specifying a user type here since there are different types of users and we can have different scenarios for them.
1 2 3 4 5 | |
Step Definition
Step definition file for this will look like below. In Step definition files, below steps are performed.
- Reading test data file by using cy.fixture() by passing relative path from Fixture folder and then alias it into a variable loginCredentials. The hierarchy is separated by forward slashes.
- Get the JSON object ( which is an array of objects) from above step and identify the specific object which we need to use for this step based on the UserType specified in feature file. This is achieved by using filter method. This is mostly like LINQ in C# . More details can be found here . This filter will return an array of object which satisfy filter criteria specified. In this case, there will be only one object in array.
- Login to the demo website by using first user in the above array.
1 2 3 4 5 6 7 8 9 10 11 12 13 14 15 16 17 18 19 20 21 22 23 24 25 26 27 28 29 30 31 32 | |
Test Output
Now it is time to run above scenario. Open Cypress by running command npx cypress open
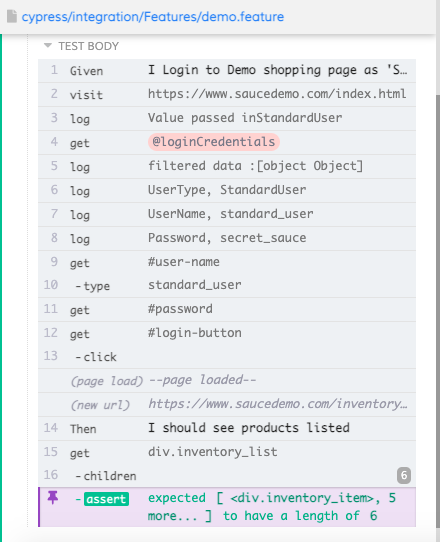
Run the scenario on cypress UI and result will look like below. We can clearly see that assertions are passed.
Reading External Files in Cypress Using readFile
In the previous post here and here, we saw how to write BDD test cases using cucumber along with Cypress and to use datatables. As we saw in those examples, we are hard coding few data in feature files. This is not a best practise since we need to modify the feature file for every new set of data. Assuming we need to have different data in different environments, this will make it hard to run the tests across various test environment. Let us look at how we can make read these data from a file outside of feature file.
Cypress provides two options to read external files. They are readFile and Fixtures. In this blog post, let us look into readFile method and how to use it.
readFile
According to documentation, the command syntax is as below
1 2 3 4 | |
cy.readFile() command look for the file to be present in default project root folder .Hence filepath should be specified relative to the root folder . For any files other than JSON format, this command yields the content of the file. For JSON files, the content is parsed into Javascript and returned.
FeatureFile
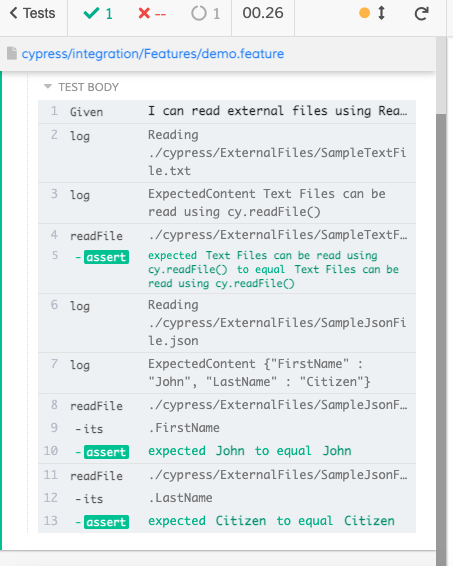
Let us write a new scenario to read both text file and json file. We then assert the content of the files.

Step Definition
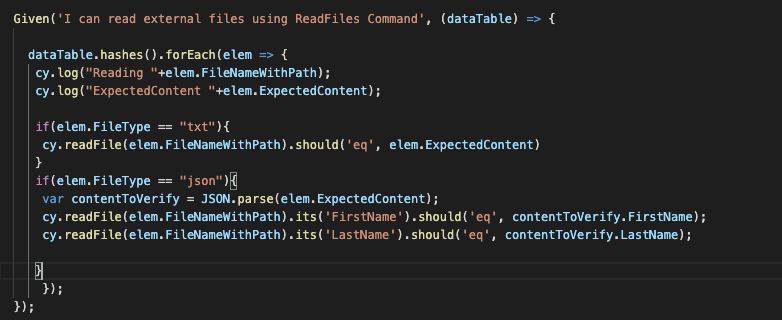
Corresponding Step definition will look like below. Here we get information from datatable and assert the text file content as is. For JSON files, cypress yields a JSON object . Hence we convert the expected text to json object and assert on its properties.
Test Output
Now it is time to run above scenario. Open Cypress by running command npx cypress open
Run the scenario on cypress UI and result will look like below. We can clearly see that assertions are passed.
Reading Configuration Values in Dotnet Core Using Options Pattern
Normally every project will have some values to be read from config files like user name, connection strings, environment specific details etc.
Dotnet Framework
In dotnet framework projects, this can be easily done by using Configuration Manager. This is available when we add System.Configuration assembly reference.
Let us look at an example of a app config file like below
1 2 3 4 5 6 7 8 9 10 11 | |
Storing user name and password in app config is not a best practise. For sake of simplicity , let us keep it here. In dotnet framework , we can read above config values with below
1 2 3 | |
Dotnet Core
Now let us look how to read above config values in a dotnet core project .
Let us look at a appsettings.json file
1 2 3 4 5 6 7 8 9 10 11 12 13 14 15 16 | |
There are different approaches to read the config file. Let us look at couple of them.
IConfiguration
One of the approach to consume this is using IConfiguration Interface. We can inject this to the class constructor where we need to consume these config values.
1 2 3 4 5 6 7 8 9 10 11 12 13 14 15 16 17 18 19 20 | |
However injecting IConfiguration is not a good practise since we are not sure what configuration is this class now depend on. Also class should know the entire hierarchy of configuration making it tightly coupled.
IOptions
Another way to access these config values is by using Options Pattern . Documentation of that can be found here. The options pattern uses classes to provide strongly typed access to groups of related settings. It also provides way to validate details.
In this pattern, we need to create an options class corresponding to the config value
1 2 3 4 5 6 7 8 | |
According to documentation, options class should be non abstract class with public parameterless constructor. All public get - set properties of the type are bound and fields are not bound. Hence in above class, Url, UserName, Password are bound to config values and SauceDemoDetails are not bound.
Let us see how we can bind the configuration file to above created class. In startup.cs file, do below
1 2 3 4 5 6 7 8 9 10 11 12 13 14 15 16 17 18 19 20 21 22 23 24 | |
Inorder to use this, we need to inject IOptions to the consuming class.
1 2 3 4 5 6 7 8 9 10 11 12 13 14 15 16 17 18 | |
One important point to remember is Ioptions interface doesn’t support reading configuration data after app has started. Hence any changes to appsettings.json after the app has started will not be effective till next restart. If we need to recompute the values every-time, then we should use IOptionsSnapshot interface. This is a scoped interface which cannot be injected to Singleton service. The usage of this is same as IOptions interface. We also need to make sure that configuration source also supports reload on change.
Validations
Let us look into how to implement validations into this. In above examples, if there are any mistakes like typo ,missing fields etc, then those fields will not be bound. However it will not error out there and will continue execution , till it throws an exception where it require these missing fields. We can add validations from DataAnnotations library to identify these earlier.
DataAnnotations provide various validator attributes like Required, Range, RegularExpression, String Length etc.
Let us add [Required] to all properties as below.
1 2 3 4 5 6 7 8 9 10 11 | |
We will also have to change the startup class to do validations after we bind.
1 2 3 4 5 6 7 8 9 | |
Using Datatable in Cypress Cucumber
In the previous post here, we saw how to use cucumber along with Cypress. The demo scenario we saw was a basic example. Now let us look into how we can use datartable in cypress cucumber.
Feature File
1 2 3 4 5 6 7 8 9 10 11 12 13 14 15 | |
The step definition file will be as below
1 2 3 4 5 6 7 8 9 10 11 12 13 14 15 16 17 18 19 20 21 22 23 24 25 26 27 28 29 30 31 32 33 34 35 36 37 38 39 40 41 42 43 44 45 46 47 48 49 50 | |
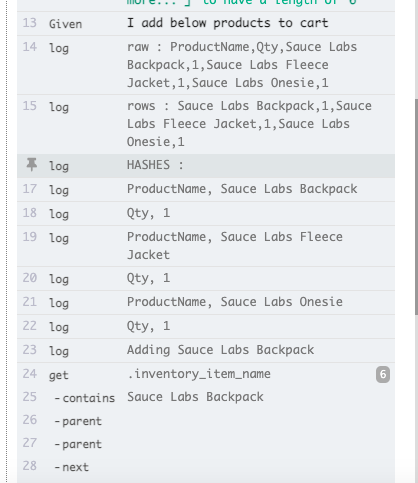
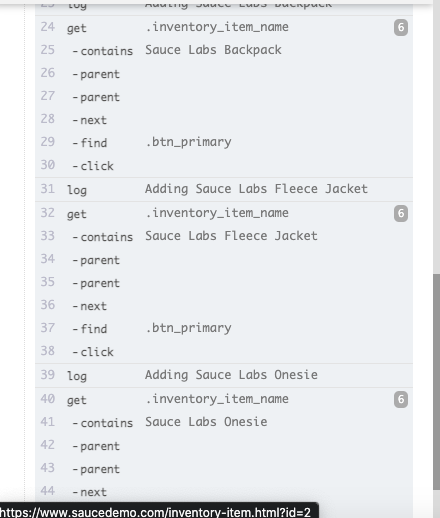
datatable can be used in few different ways . Documentation of cucumberjs is here. I have used datatable.Hashes which return an array of hashes where column name is the key. Apart from datatable.Hashes, there are other methods like row( return a 2D array without first row) , raw( return table as 2D array) , rowsHash(where first column is key and second column is value) etc.
Running this in Cypress will result in below. we can see the values logged by cy.log