Writing Cypress Tests in BDD Format
As discussed in previous posts here and here, we use Cypress for writing tests to validate GUI and API tests. In many companies we use behaviour driven development practises where the requirements or acceptance criteria are specified in Gherkin format. As a results, test automation scenarios are also written in Gherkin format. Cucumber , Specflow etc are some of such framework used extensively . In this post, let us examine how we can write BDD test cases in Cypress.
First step is to identify , how we can run Gherkin sytanxed specs with Cypress. This is done with help of cypress-cucumber-preprocessor.
Installation
Installation of this package is straight forward
1 2 | |
Configure
Once NPM package is installed, then next step is to configure Cypress to use it. It consist of 3 main steps.
- Add below code to cypress/package/index.js file.
1 2 3 4 5 | |
- Modify package.json to add below line
1 2 3 | |
nonGlobalStepDefinitions is set as true, which means Cypress Cucumber Preprocessor Style pattern will be used for Step definitions. Default value is false which means old cucumber format of everything global will be used.
There are some other configuration values which we can specify . Details are available in above project documentation link.
- Add support for feature files in cypress.json.
1 2 3 | |
Normally browser is relaunched for each feature files which will result in extended test execution time. cypress-cucumber-preprocessor provides a way to combine all files into a single features file. Above snippet shows that we can expected files named as .feature and .features.
Feature Files
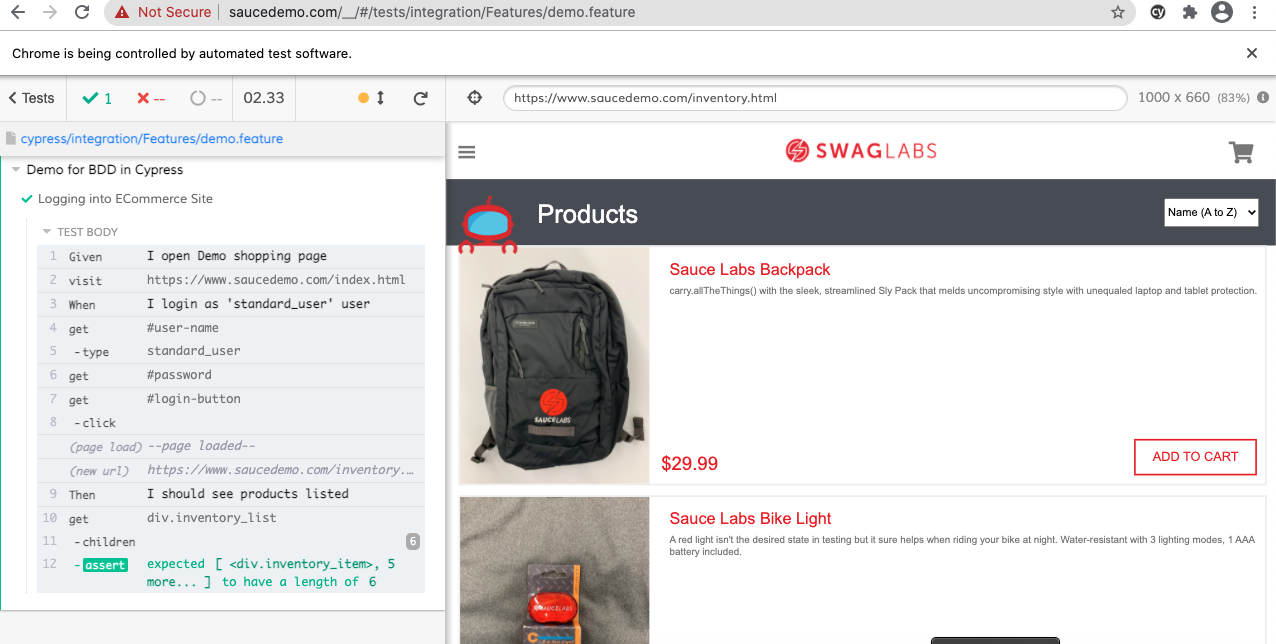
Now it is time to add a feature file. Add a demo.feature file inside Integration/Feature folder. Add below Gherkin into that file
1 2 3 4 5 6 7 8 9 10 | |
Step Definitions
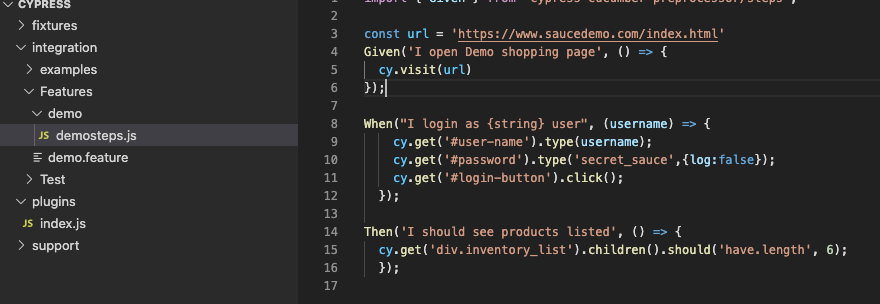
Recommended way is to create Step definiton files in a folder named as Feature and keep it inside where we have feature files. Let us create a demosteps.js file.
Location of feature file : Integration/Feature/demo.feature.
Location of StepDefinition : Integration/Feature/demo/demosteps.js
Note: Recommendation from team is to avoid using older way of having Global step definitions defined in cypress/support/step_definitions. More about the rationale for that is available in github documentation. We have specified to use latest style in package.json earlier.
1 2 3 4 5 6 7 8 9 10 11 12 13 14 15 16 17 18 19 20 21 22 23 | |
Now run above demo file. This can be done in Cypress UI.
Folder structure is as below
How to Validate XHR in Cypress
In the previous post we saw about working with Cookies in Cypress. Now let us look at how we can work with XHR request in Cypress.
XHR stands for XMLHttpRequest. It is an API in the form of an object whose methods transfer data between a web browser and a web server. Cypress provides inbuilt functionality to work with XHR request. It provides us with objects with information about request and response of these calls. It will help to do various assertions on header, url , body , status code etc as needed. It also help us to stub the response if needed.
In Cypress 5 , the XHR testing was done mainly using cy.server() and cy.route(). However they are deprecated in Cypress 6.0.0. In version 6, XHR testing can be done using cy.intercept(), which will help to manipulate behaviour of HTTP request made.
Usage format as defined in cypress documentation is as below
1 2 3 | |
As you can see in above, the last parameter is routeHandler , which defines what should happen if cypress is able to intercept a call matching initial parameters. We can specify the criteria as either a URL (either string or regular expression) , method (string) & url (string or regular exp) or various combinations using routeMatcher. RouteMatcher has a list of properties based on which we identify the network calls. Properties are like path, url, auth, headers etc. Cypress documentation has more details on this.
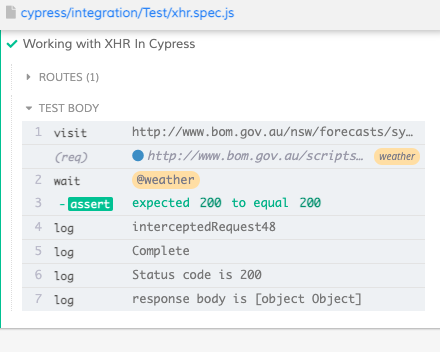
Now let us look at a practical example of asserting XHR. In below example,
1 2 3 4 5 6 7 8 9 10 11 12 13 14 15 16 17 18 19 20 21 22 23 24 25 26 | |
Below is the results from running above test. As you can see the response body is an object.
Stubbing an XHR request
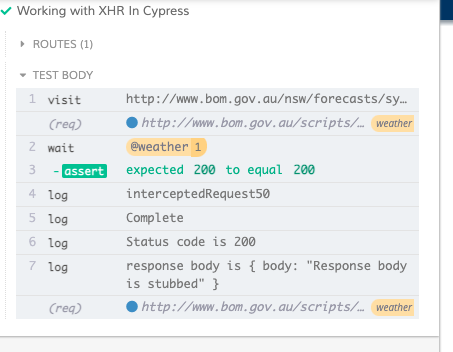
Now let us see how we can stub the response call. Add another parameter to intercept method , which matches the routeHandler.
1 2 3 4 5 6 7 8 9 10 11 12 13 14 15 16 17 18 19 20 21 | |
Below is the results from running above test. As you can see the respone body is now having stubbed value passed above
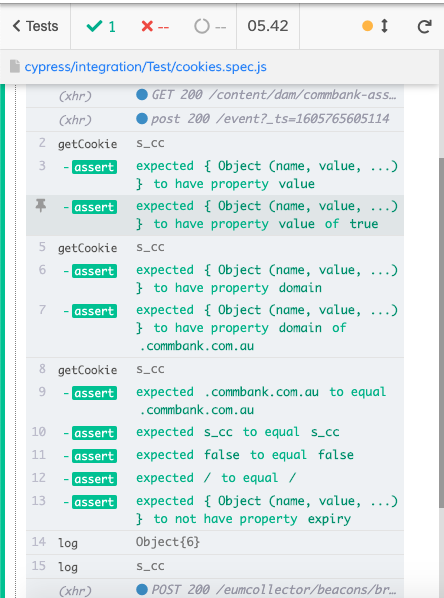
How to Read Browser Cookies in Cypress
Cypress has inbuild support to read browser cookies. There are two commands for this - GetCookie and GetCookies. Refer documentation for more details
GetCookie
This command get a cookie by its name.
1 2 3 4 5 | |
Examples usage is as below
1 2 3 4 5 6 7 8 9 10 11 12 13 14 15 16 17 18 19 20 21 22 23 24 25 26 27 28 29 30 31 | |
Results from test run will look like below
How to Modify Environment Variables for a Different Not Logged in User in Windows
Modifying environment variables for a logged in user is straight forward. However there are some instances when we need to modify environment variables for a different user. One frequent usage which I have come across is when we need to modify PATH variables for a service account in a CI box. Service account may not have local logon rights to the machine Or we may not know its password. Hence I always end up using below method to update path variables
Identify Security Identifier(SID)
Open command prompt and use below commands
Replace USERNAME with actual username
1
| |
We can also find username based on SID Replace SIDNUMBER with actual value
1
| |
Once we have the SID number of the next user, move on to next step
Modify Registry
- Open registry editore (Regedit.exe) in windows.
- Navigate to HKEY_USERS >> SID of USER>> ENVIRONMENT
- This should display all defined environment variables. We can modify all variables as we need
Generating C# Classes From Xsd
XML Schema Definition tool will help to generate classes that conform to a schema. Steps are as follows.
- Open VS Command prompt . ( Start Menu >> Visual Studio 2019 >> Developer command prompt for VS2019)
Pass xml schema as an argument to xsd.exe . \c at the end denotes to generate classes
xsd.exe C:\Temp\sampleschema.xsd /c /o:C:\TempThere are other options as well. Main ones are below.
xsd.exe <schema.xsd> /classes|Dataset [/e:] [/l:] [/n:] [/o:] [/s:]

/classes | Dataset : denotes whether to generate class or dataset
/e: Element from schema to process
/l: Language to use for generated ode . Choose from 'CS','VB','JS','VJS','CPP'. Default is CS
/n: Name os namespace
/o: Output directory for generated classes
There are other options as well. Details can be found on help “xsd /?”
Location of xsd.exe tools is under C:\Program Files (x86)\Microsoft SDKs\Windows\
Exercism
Most crucial factor for effectively learning a programming language are below.
- Having hands own experience
- Having a structured learning path
- Having a mentor to guide and review the code.
I was recently looking to learn more about javascript and came across Exercism.io. Exercism.io offer a solution for all above factors and is free of cost
All language track will have a series of exercises starting with very basic hello world program and then moving to complex concepts. User should download the exercise , which will have a failing test suite. Once we implement the code and ensure test cases are now passing , we can submit the code for mentor review. Mentors review the code and suggest better ways of doing it, if any. Exercism.io will prevent us from jumping ahead and force to complete one exercise before moving to next one. This actually helps to follow a structured learning path .
Some of the language track doesn’t support Mentored mode initially . For those tracks, user can join in practise mode and then move on to mentored mode.
Sending Emails Through SMTP in C#
Recently I was looking for some code for sending emails via SMTP in C#. Below are few links which I found with some reusable code. Overall it looks fine , but have to include multiple validations for error handling .
- https://gist.github.com/robertgreiner/1529127
- https://gist.github.com/gzuri/2850914
- https://gist.github.com/pranavq212/1cbecac15abb229d40f1ad0765aa4dce
- https://gist.github.com/TrailCoder502/6254bdfcfe71c4000600
In Nutshell, flow is as below
- Define a function to send email which accepts an input Email object
- Validate the email object to ensure all mandatory fields are present and correct
- Create a new MailMessage object and SMTPClient Object and send email
Above gist links have some reusable code to achieve step 3 of above.
Creating Utility Tool as Portable EXE
Recently one of my colleague approached me asking to help on creating a utility tool using selenium web driver. The requirement was simple which includes accepting few arguments from the command line and then open a browser and complete some actions on browser based on inputs provided. Having worked on selenium web driver for a few years, I thought this is relatively simple and can be done quickly.
It is implemented as a C# console app which had reference to selenium web driver. It accepts few arguments from command line and based on the values it opens up chrome browser and completes the action. The initial version was already there on which I made some modifications. We gave a demo to the user and thought it is all done.
As in any normal software projects, it was far from over. There were additional requirements to support multiple browsers, flexibility to provide arguments in any required order, the requirement to display detailed help text so that end user will know how to use the utility tool. All of them was done and we shared the build output, which included the exe file, all dlls used, drivers for various browsers and configuration files. That’s when I had my next requirement to make it as a portable EXE with the single exe file. That is not something which I had done before. Hence I spent quite some time to google and read through various approaches.
Fody.Costura
Costura is an addin for Fody. It helps to embed all assembly references into the output assembly/exe. Details documentation and source code can be found in github. Usage was pretty easy.
- Install nuget package
Install-Package Costura.Fody. - Create a FodyWeavers.xml ( modify if it exists) in the root folder of project . Update contents as below
1 2 3 4 | |
- Make sure all required dlls are marked as “Copy Local”.
- Build the project
This helped to combine all dlls like webdriver, newtonsoft dll etc into the utility exe file. The build output had only an exe file, config and other resources which I marked to copy to output.
Embedding Resources
Fody.Costura helped to combine exe files with required dlls and there by reducing number of files which needs to be distributed. However, I still had few text and json files which are resources for this tool. Initially, all required resources were copied to output and were accessed from there.
There is an option to embed all required files. It is done by changing BuildAction in properties to Embedded Resources. This will include files in output assembly which can be accessed in code.
This webpage has more details about how it can be done.
Below code snippet will show how it can be accessed. This shows how to read a resource file called Help.Txt
 var assembly = Assembly.GetExecutingAssembly();
 var resourceName = "NameSpaceName.SubFolderPathWhereResourceIsKept.Help.txt";
 using (Stream stream = assembly.GetManifestResourceStream(resourceName))
 using (StreamReader sr = new StreamReader(stream))
{
 var line = sr.ReadToEnd();
 Console.WriteLine(line);
}
After completing above two steps, I was able to combine all dlls and other required files into the Utility Exe. Now I just had to distribute exe file and the drivers for various browsers.
Find DotNet Version Using Powershell
I recently faced an issue where one utility tool created by me was not running properly on another machine which had different dot net version installed. During troubleshooting, I was looking for ways to identify the installed dotnet version. Most of the links in google suggested to look for release value in registry as specified here.
Below powershell script will list down installed dotnet version on a machine. This is based on dotnet version listed on https://docs.microsoft.com/en-us/dotnet/framework/migration-guide/how-to-determine-which-versions-are-installed. We may have to update below snippet as when new versions are released. Currently it supports upto dotnet 4.7.2
1 2 3 4 5 6 7 8 9 10 11 12 13 14 15 16 17 18 19 20 21 22 23 24 25 26 27 28 29 | |
Note: This assumes user can run Powershell with admin access so that it does not go through constraint language Mode . If running above script result in error like “Method Invocation is supported only on core types in this language mode”, it means it is on constraint language mode. In that case, we can run just Get-Childitem "HKLM:\SOFTWARE\Microsoft\NET Framework Setup\NDP\v4\Full" and manually look for release key in above microsoft link
Deploying Octopress to AWS S3 and CloudFront
I was hosting my blog on github pages for past one year. Last week I decided to move hosting of my blog to AWS S3. There are obvious advantages of hosting a static site on S3. Moreover the cost of hosting is also minimal. There are many blogs in internet which explains the steps for hosting an octopress blog on S3.
Since this is my first exposure to AWS world, I did had a learning curve to get this done. Below are highlevel steps involved in hosting in S3.
- Create an AWS login . Free plan was enough for my sites usage and traffic.
- AWS recommends creating an IAM user for all activities instead of using root login. Hence I created an IAM user and gave permission to work on S3, Cloudfront, codecommit. Grab the AWS access KeyId and Secret Key from MyAccount > Security Credentials > Access Keys (for IAM user).
- Install and configure
s3cmdfor uploading to S3 bucket. s3cmd is a free commandline tool to manage upload and retrieval of data from S3 bucket. Below are steps on Mac using homebrew for installing.
1 2 3 4 5 6 7 8 9 10 11 12 13 14 15 16 | |
- Create S3 Bucket through s3cmd. Tutorial suggest creating S3 bucket with same domain name as static site.
1 2 | |
- Login to AWS management console and verify the bucket exist.
- Navigate to properties and enable Static Website Hosting . Select index.html as index document. This will give the direct link to blog once it is hosted.
- Also enable public access to read objects in Permissions tab.
- Now, we need to modify the rake files to deploy to S3 Bucket. I was previously using Github pages and deploy was deploying to github. Hence made below changes to Rake File to deploy to S3 Bucket . It can be done by adding below details to Rake File.
1 2 3 4 5 6 7 8 9 10 11 12 13 14 15 16 17 18 19 | |
- Run
rake deployto deploy the website to AWS S3 bucket. - Configure domain DNS to point to the AWS site( the link generated while enabling static website hosting) . We need to configure corresponding DNS entires in domain provider(in my case CrazyDomain).
- At this point we can even use AWS Cloud Front. I followed the steps mentioned here and here for setting up a cloudfront and corresponding SSL certificates. Process is straight forward and easy to follow. Only place I struggled is while configuring dns entries in crazy doman as part of dns validation step during SSL certificate generation. I could not find the place to enter NAME for CNAME field. It is named as Subdomain in crazydomain.
- Finally setup CNAME in domain provider to redirect to cloudfront url for our blog
While playing around with AWS, I noticed that AWS codecommit is always free for normal user ( eventhough usage limitation apply ) . I found that usage limitation is pretty high and I may not have to worry about that. Hence I decided to use AWS code commit for keeping blog’s source repository . (Partly because Github doesn’t support private repo on free plan). Process was straight forward as we do with any other source control system like Bitbucket, gitlab or github. Only catch I found was , we need to seperately create Https Credentials/SSH keys for AWS codecommit in IAM. The user name and password is different from normal login. Once everything was setup, I just changed the remote repository details on my local and pushed it through.