Mountebank - Creating a Response Based on a File Template and Modifying It Based on Request - PART 1
In the previous two blog post, I have explained about how to setup mountebank (here) and how to create a virtualised respone(here) . Now coming to more detailed use cases which we might encounter in daily life. In this blog post, I will explain how we can use mountebank to create a virtualised response based on a template response stored in a file and modifying certain fields in response based on the request coming through.
In below Step by Step example , I will have two mock responses for searching for a customer details. First response is when customer is not available in back end systems and second response is when customer details are found.
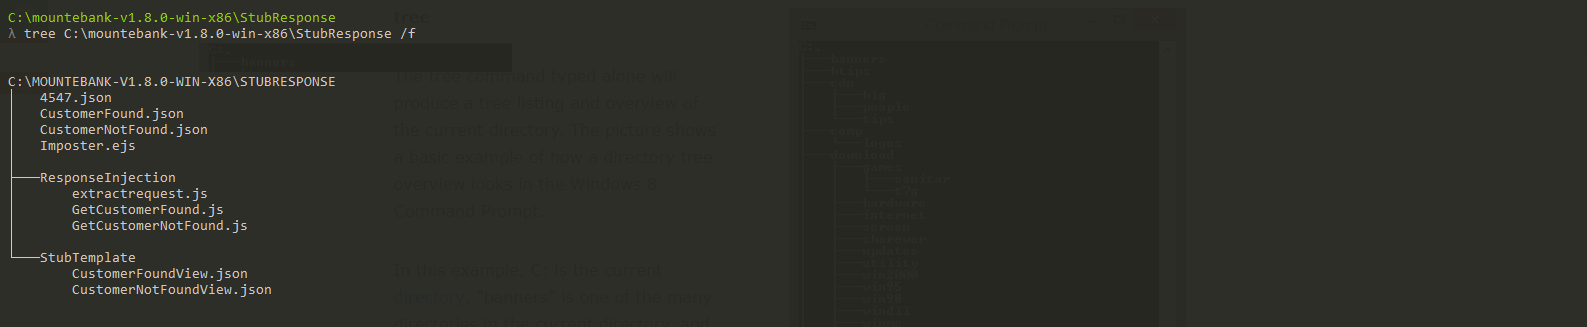
Before we start, below is folder structure which I have and in this blog post we are discussing about only one stubbed response, which is the NOT FOUND scenario.
Let us first create the imposter.ejs file
1 2 3 4 5 6 7 8 | |
Now let us create the file which specifies the port number where it should run and order of responses. Below code tells mountebank that port which it needs to listen for incoming request is 4547 and protocol is http. There are two set of mock responses planned.
1 2 3 4 5 6 7 8 9 10 11 12 13 | |
In this example, let us look at first mock response.
1 2 3 4 5 6 7 8 9 10 11 12 13 14 | |
From above response, we can infer below. When ever an http GET request come to port 4547 , with a path matching “/Blog.Api/1[0-9]+/CustomerView', then we will call the Javascript function "GetCustomerNotFound.js” which is kept inside a directory “ResponseInjection” in same location. It is also good to notice that , predicate is a regular expression ( hence use matches) and all request where 1 followed by any number of numeric will be returned with this response
The javascript function listed here is responsible for reading the sample template response and sending it back .
1 2 3 4 5 6 7 8 9 10 11 12 13 | |
Above function reads a json response kept inside directory “StubTemplate” and convert it to json and return to mountebank. Since this is for a scenario where customer records are not found,we set the status code as 404. We can also set the headers if needed
The stub template is as below
1 2 3 4 5 6 | |
Now let us run mountebank

Request through postman
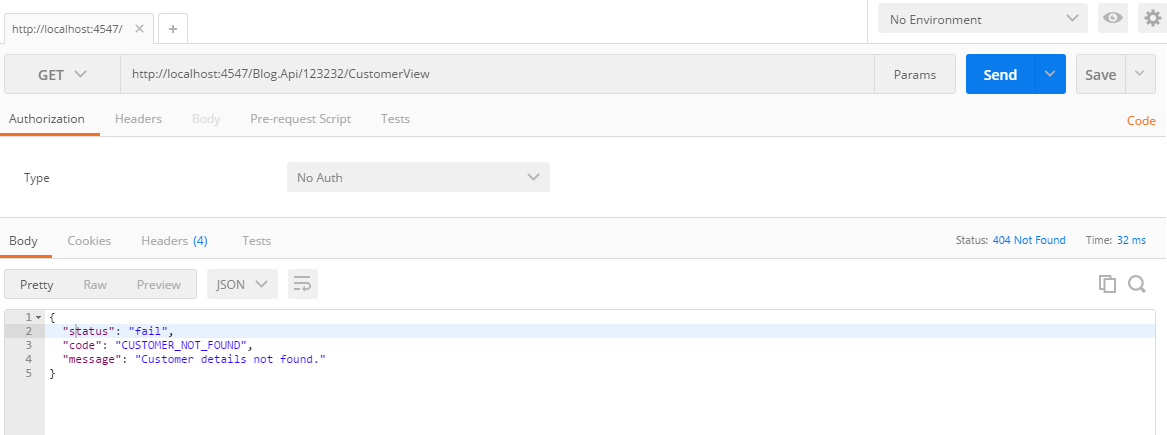
As you can see , the GET request matching with predicate is returning the stubbed response with status 404.
For real time usage for testing any web application which needs to get a 404 message from back end API calls, just point the end point to this local host end point and fire a request which matches the predicate.
Details of second response will be shared in next blog post
Creating HTML Report for Test Execution Result
How to create HTML report with details of test execution
Very often , we will be required to create a report with details of test execution , so that it can be presented to various stakeholders. Specflow provides a feature to create HTML reports. Let us look into more details about how is this done
- Read through and understand details of reporting from specflow.
- Ensure packages for Specflow, Nunit, Nunit console runner are already installed.
- If you are using Nunit 3, install NUnit.Extension.NUnitV2ResultWriter package via nuget package manager. If this is not installed, we will get an error “Unknown result format: nunit2”.
- Follow setups required for running specflow test cases from command line. Details can be found here.
- Modify the bat file to create nunit2 reports.
1
| |
- Add below command into Bat file. This will create HTML Report called “MyResult.html”
1
| |
- Final bat file will look like below.
1 2 3 4 5 | |
EDITED: If it throws below error in newer version of Visual Studio then ensure MS Build tool 2013 is installed. It can be downloaded from https://www.microsoft.com/en-US/download/details.aspx?id=40760
Error : “The tools version "12.0” is unrecognized. Available tools versions are “2.0”, “3.5”, “4.0”. “,
Running Specflow Test From Command Line Using Nunit
How to run specflow test cases from command line
We can use nunit console runner for running specflow test cases from command line. Running specflow test cases through nunit console runner will help to create test results in xml file, which can then be used for creating html reports.
Procedure for command line test execution are
- Define Nunit as the test runner. This is done in config file
1 2 3 | |
- Include Nunit.Console.Runner package to solution via nuget package manager
- Run specflow test cases using below command. We can create a bat file with below command and execute them as required.
1 2 3 4 | |
Mountebank - Your First Service Virtualisation
In current development world, there will be scenarios were both API and its consumers are developed in parallel. Inorder to decouple their dependencies, we can mock an api response using mountebank. In this example, I will explain how to get started with your first service virtualisation using mountebank. After installing mountebank as mentioned in here (Install Mountebank), we will proceed with configuring mountebank. It can be done in few ways. The method which I explain below is by using file based configuration. This involve setting up an imposter file and a stub response
How to Create a Stub
Navigate to mountebank installation path
Create a folder and name it as “StubResponse”. ( You can name it whatever you want)
Create two json file using notepad and save it as “MockResponeForApiOne.json” and “MockResponeForApiTwo.json”( Or what ever you want).
Copy paste below code to “MockResponeForApiOne.json” . Sample example only. Update the response and predicates to suite your need ( if required)
1 2 3 4 5 6 7 8 9 10 11 12 13 14 15 16 17 18 19 20 21 22 23 | |
-
- Copy paste below code to “MockResponeForApiTwo.json” . Sample example only. Update the response and predicates to suite your need ( if required)
1 2 3 4 5 6 7 8 9 10 11 12 13 14 15 16 17 18 19 20 21 22 | |
How to create an Imposter
Create another file called test.json in same path as above
copy and paste below contents to it
1 2 3 4 5 6 7 8 9 10 11 12 13 14 15 16 17 | |
Let us have a close look into Imposter and stubs
Responses – Contains an array of responses expected to return for the defined stub. In the above scenario the response will include status code as 200 and response body. For more info, http://www.mbtest.org/docs/api/contracts Predicates – is an array of predicates which will be used during matching process. Predicate object can be quite complex, it supports lots of different matching techniques. For more info, http://www.mbtest.org/docs/api/predicates
Let’s Mock it
Once all required files are created and saved, mountebank can be started by following command in command prompt , after navigating to installation folder of mountebank
1 2 | |

Once mountebank is started, we can verify it by navigating to path http://localhost:2525/imposters
It will list out all active ports and a list of stubs available

Test It
Once we complete above steps, mountebank is ready with stubs. Now comes the part to test it and use. You can use any api testing tool ( Postman, soapUi etc ) for testing this. Just send the request matching the predicates and look for the responses
Below are the screenshot of Postman request
Requesting for First API.
Predicate of response One says that , request has to be of type POST, body of request should have “username” and “password” . Path of the request should have /Apitesting/v1/test?type=ResponseOne"
Now construct a postman request matching above and fire it

Request for second API
Predicate of response One says that , request has to be of type POST, body of request should have “email” and “password” . Path of the request should have /Apitesting/v1/test?type=ResponseTwo"
Now construct a postman request matching above and fire it

As you can see, both request has succesfully received expected response message
For actual development usage, just point your application to this localhost URL and start consuming virtualised API
Service Virtualisation Using Mountebank
What is Mountebank?
As per mbtest.org "_mountebank is the first open source tool to provide cross-platform, multi-protocol test doubles over the wire. Simply point your application under test to mountebank instead of the real dependency, and test like you would with traditional stubs and mocks_"
In short mountebank is a open source service virtualisation tool . Mountebank uses imposters to act as on demand test doubles. Hence our test cases communicate to Mountebank and mountebank responds back with relevant stubs as defined.
How to Setup Mountebank ?
Installation can be done via two methods
npm
Mountebank can be installed as a npm package. Node.js should be installed for this option to work
<code>npm install -g mountebank</code>
Self contained Installation file
OS Specific installation file can be downloaded from Download
Note: Please read through the windows path limitation mentioned in above link
UI Testing- Decoupling Back End Dependency
The traditional approach for automating UI test cases is to create selenium web driver based ( or any UI testing tools) scripts for exercising complete end to end flow. However, it comes with its own challenges. It will have multiple steps as pre-requiste for reaching required UI page and hence it behaves as an E2E integration test rather than UI test.
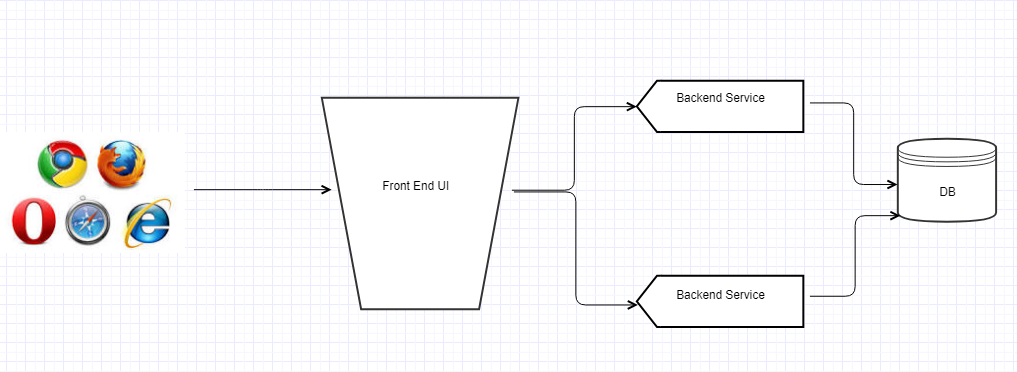
A typical web application architecture will have one or more front-end application, which will talk to multiple back-end services, API’s etc. They will, in turn, talk to other back-end services or to different databases. On High level , architecture looks like below
On an enterprise world, all these will be developed and maintained by different teams. All of them will be working in parallel and will push in their code changes ( including occasional broken code) frequently. This will result in breakages since test automation scripts heavily depending on UI and its integration. Even if there is no broken code, a test can still fail due to multiple environmental issues for any of the backend services and other components. Hence it will become increasingly difficult for achieving a green build.
Hence UI based test cases are less robust due different reasons like
Test depends on external factors which are outside of our control and not part of scope of testing
Failing test may not pin point exact location of failure since it is trying to test too many things.
There are chances that all components will not be ready when we want to test UI. Hence testing it pushed to the end , which will increase cost of fixing defects.
Re - running of test cases may pass (if failure is caused by environmental issues)
UI test are brittle by nature since they will even fail due to timing issues because it is depending on data from back end services.
The solution for above is to adopt more unit test like structure for UI testing. We should be testing UI in isolation to other back-end services and their dependency. This allows testing as much as possible early in lifecycle without any dependency on other streams. We should replace all backend service calls with stubs
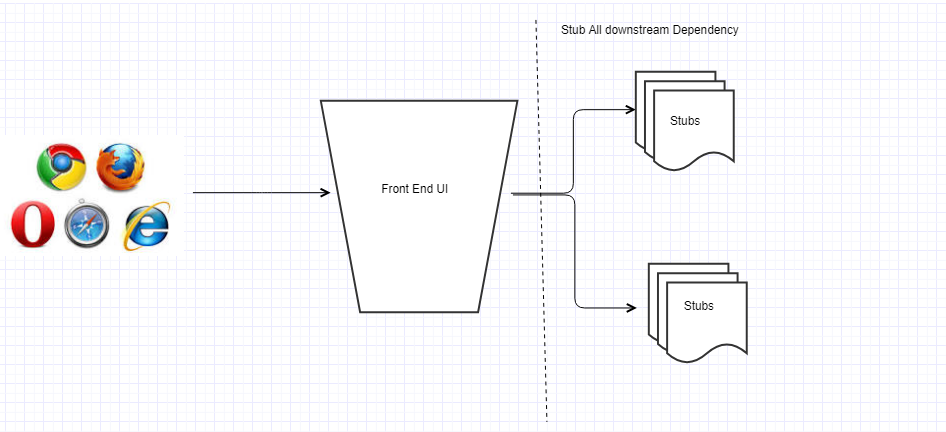
Mountebank is a tool which we can use for mocking the service calls. As per mbtest.org, mountebank is the first open source tool to provide cross-platform, multi-protocol test doubles over the wire. We can use mountebank for stubbing the back-end service calls and there by use it for decoupling UI from unpredictable back end.
Powershell - Copying Folders and Files
Two options for copying files are below.
- Robocopy - More details can be found at Robocopy
- Copy_Item cmdlet - More details can be found at Copy-Item
Copying Folder structure Only
1 2 3 4 5 6 7 8 9 | |
Flattening Folder structure - Copy all files from nested folders to a single folder
1 2 3 4 5 6 7 8 | |
Copy same folder structure
1 2 3 | |
Git - How to Solve Filename Too Long Error
Git for windows is normally shipped with long path support disabled due to mysys not supporting file path/name greater than 260 character. While cloning repository with large nested directory structute may cause error “file name too long”. This can be fixed by below command. It can be executed using powershell or cmd directly in project ( or anywhere if git variable is available)
1
| |
Running Command Line From C#
Code Snippet
1 2 3 4 5 6 7 8 9 10 11 12 13 14 15 16 17 18 19 20 21 22 23 24 25 26 27 28 29 30 31 32 33 34 35 36 37 38 39 40 41 42 43 44 45 46 47 48 49 50 51 52 53 54 55 56 57 58 59 60 61 62 | |
Element Location Using XPath Axis Part 2
In previous post, I have mentioned different ways of identifying web elements using XPath . Very often , we will have to identify child elements while automating using selenium. Let us consider below example . This is an HTML layout of table
1 2 3 4 5 6 7 8 9 10 11 12 13 14 15 16 17 | |
Assuming we need to iterate across all the rows to identify which row have the name “Eve” and then do some action on that row . This can be achieved by below
1 2 3 4 5 6 7 8 9 10 11 | |
Important step here is to use “.” in XPath so that selenium limit its search for current node rather than everywhere on document. This will help to identify elements with respective to another element.
Further details of how to use XPath can be found in https://www.w3schools.com/xml/xpath_syntax.asp
Main ones are
- / - Search from root
- // - Search anywhere in document which match selection
- . - select current node
- .. - select parent of current node