Running Command Line in Remote Machine Using WMI
Recently I had to find a way for running a command line process in server. I had to spend fair bit of time googling for various approaches of doing it. Most of them are by using PSExec. However there is another approach of using WMI (Windows Management Instrumentation) . Below is one of the approach , which I found at msdn blog.
Below method can be accessed anywhere by
1 2 | |
The solution has multiple parts as follows
- Connect to remote machine using remote machine Name, user name and password
- Start the remote process. Win32 process and pass the command to be run
- Find if the remote process is running and if it does, start an event monitor to wait for it to exit
- Once the process exits, retrieve its exit code
Code below is taken from above MSDN link ( Just to make sure it is available for me even if original MSDN link is unavailable in future.
1 2 3 4 5 6 7 8 9 10 11 12 13 14 15 16 17 18 19 20 21 22 23 24 25 26 27 28 29 30 31 32 33 34 35 36 37 38 39 40 41 42 43 44 45 46 47 48 49 50 51 52 53 54 55 56 57 58 59 60 61 62 63 64 65 66 67 68 69 70 71 72 73 74 75 76 77 78 79 80 81 82 83 84 85 86 87 88 89 90 91 92 93 94 95 96 97 98 99 100 101 102 103 104 105 106 107 108 109 110 111 112 113 114 115 116 | |
Running Powershell Remotely
Code snippet for running power shell on a remote machine. Loosely based on blog post here and here
Code below is based on the sample code given in above two links
Add reference to System.Management.Automation
1 2 3 4 5 6 7 8 9 10 11 12 13 14 15 16 17 18 19 20 21 22 23 24 25 26 27 28 29 30 31 32 33 34 35 36 37 38 39 40 41 42 43 44 45 46 | |
Working With Windows Services
Below is code snippet for working with windows service. It helps to find status of service, start , stop and restart as required.
We need to pass in details of windows services name ( as shown i services.msc ) and machine name(should be in same network).
1 2 3 4 5 6 7 8 9 10 11 12 13 14 15 16 17 18 19 20 21 22 23 24 25 26 27 28 29 30 31 32 33 34 | |
Comparing XML File Structure Without XSD
Code snippet for comparing two xml files without using xsd for validating their structure is same ( nodes and arguments should be same. Values of each node/argument can be different).
1 2 3 4 5 6 7 8 9 10 11 12 13 14 15 16 17 18 19 20 21 22 23 24 25 26 27 28 29 30 31 32 33 34 35 36 37 38 39 40 41 42 43 44 45 46 47 48 49 50 51 52 53 54 55 56 57 58 59 60 61 | |
Converting Datatable to List of Objects in CSharp
There are many cases where we will have to convert Dataset into list of objects. Below is a generic method using reflection to achieve that.
Below will work only if datatable column name and class property name are same and they match exactly.
1 2 3 4 5 6 7 8 9 10 11 12 13 14 15 16 17 18 19 20 21 22 23 24 25 26 27 28 | |
Usage of this will be like below
1 2 3 | |
Running API Test Using Cypress
Cypress is not just UI automation tool . It can be used for testing APIs as well . Even though we have other tools like Postman, Newman, Rest Assured, SOAP UI etc for testing APIs, I believe cypress is a good alternative for testing API. It will help to use same tool for both UI and API test automation.
Demo
Let us look at a sample API test case. In below example, we trigger a API call to http://services.groupkt.com/country/get/iso2code/AU and validate below in the response.
- Status code of response is 200.
- Header include ‘application/json’.
- Body contain “Country found matching code [AU].”
We can then extend this to do any further checks if needed.
Create a new file inside Integration folder of cypress and copy below code into that.
1 2 3 4 5 6 7 8 9 10 11 12 13 14 15 16 17 18 19 20 21 22 23 24 25 26 27 28 | |
Open Cypress by running node_modules/.bin/cypress open inside cypress root folder. This will open up Cypress.
Run newly created test.
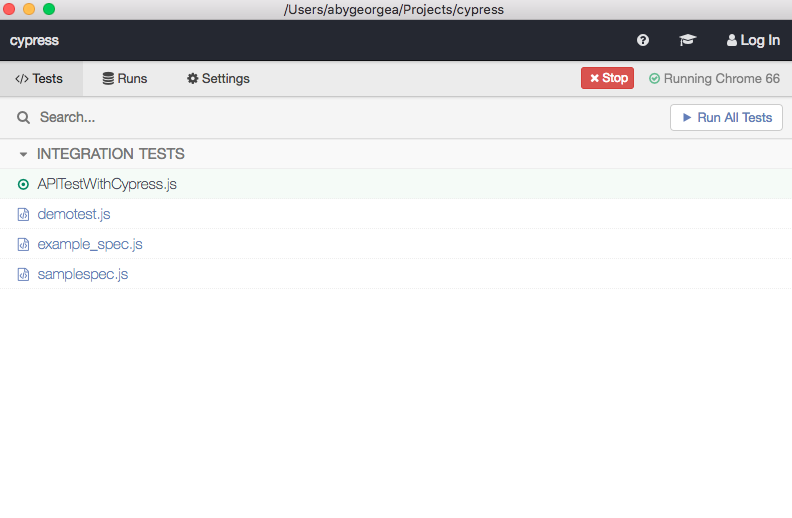
Results of test execution will look like below.
![[APITestingWithCypress]](/images/2018/05/27/02%20Check%20Result.png)
Expand each of them and right click on the asserts and inspect the element. This will open up chrome developer tool. Select the console tab , which will list down details of calls made, request received and assertions performed. It will help to write additional assertions, investigate any failure etc.
![[APITestingWithCypress]](/images/2018/05/27/03%20Expand%20and%20Analyse%20result.png)
UI Automation With Cypress
When we talk about UI automation for browsers, the default tool which comes to mind is Selenium. There are different wrappers around selenium like protractor, Nightwatch , selenium webdriver etc. All of them are build on top of selenium and have all advantages /disadvantages of selenium. All of the control browser by executing remote commands through Network. We will most probably need additional libraries, framework etc to make full use of selenium.
Cypress.io is an open source UI automation tool which can be used for UI testing . Unlike others, this is not build on top of selenium . Instead is a complete new architecture and run in same run loop as browser. So it is running inside browser and have access to almost everything happening inside and outside browser. It is a complete set of tools that you will require to create and run E2E UI automation test cases. Team who developed cypress has made few design trade off which causes some disadvantages to cypress. There is no right tool for automation . It will depend on multiple factors.
Installing Cypress
We can install cypress using npm. Run below command inside project folder to install cypress and all dependencies.
1
| |
Another way of using cypress is to download zip file from here . Just extract the file and start using it.
Opening Cypress
Cypress can be opened by running node_modules/.bin/cypress open command in terminal under /cypress.
If you have downloaded the zip file, you can open cypress by double clicking on the cypress executable.
Write your first test
Cypress already come with predefined example of KitchenSink application which will help you to identify various commands which can be used. It can be found under cypress\integration\example_spec.js.
Let us look at how to write a new test .
Create a new test script file called demotest.js under {project_location}\cypress\integration. Open up the file and write below code into it.
This code will open browser, load google and search for cypress.io and open up the first link.
1 2 3 4 5 6 7 8 9 10 11 12 13 14 | |
Note: If cross origin policy error is shown, flow the workarounds mentioned.
How does cypress.io compare with Selenium
As mentioned earlier, there is no right or wrong tool for automation. It all depends on suitability for the task on hand. Let us compare few features where cypress.io and selenium have differences.
- Cross browser support - At this point selenium have more cross browser support that cypress. Cypress supports only chrome variants. You can read about them here
- Debugging capability - This is high in cypress. I found that error message are more details and infact provide some more details about how to fix it. Also you have full access to chrome dev tools.
- Keypress - As of now , cypress doesnt support pressing Tab key . You can read about it here.
- Since cypress is build on node.js, we can chain commands together
- Cypress.io have built in support for test framework and assertion libraries like mocha, chai etc
- Cypress.io test cases can be written in Javascript
- Cypress.io handles wait times better than selenium
- Cypress.io have hot reloading of test cases. When we make changes to test cases and save it , the test rerun by itself. This is very effective to reduce time spend on building and rerunning selenium based test cases.
- Cypress.io have built in time travel and screenshots which will help us to go back to failure points and debug. It also capture before and after state for all actions
I will keep adding to this when I play more with cypress.
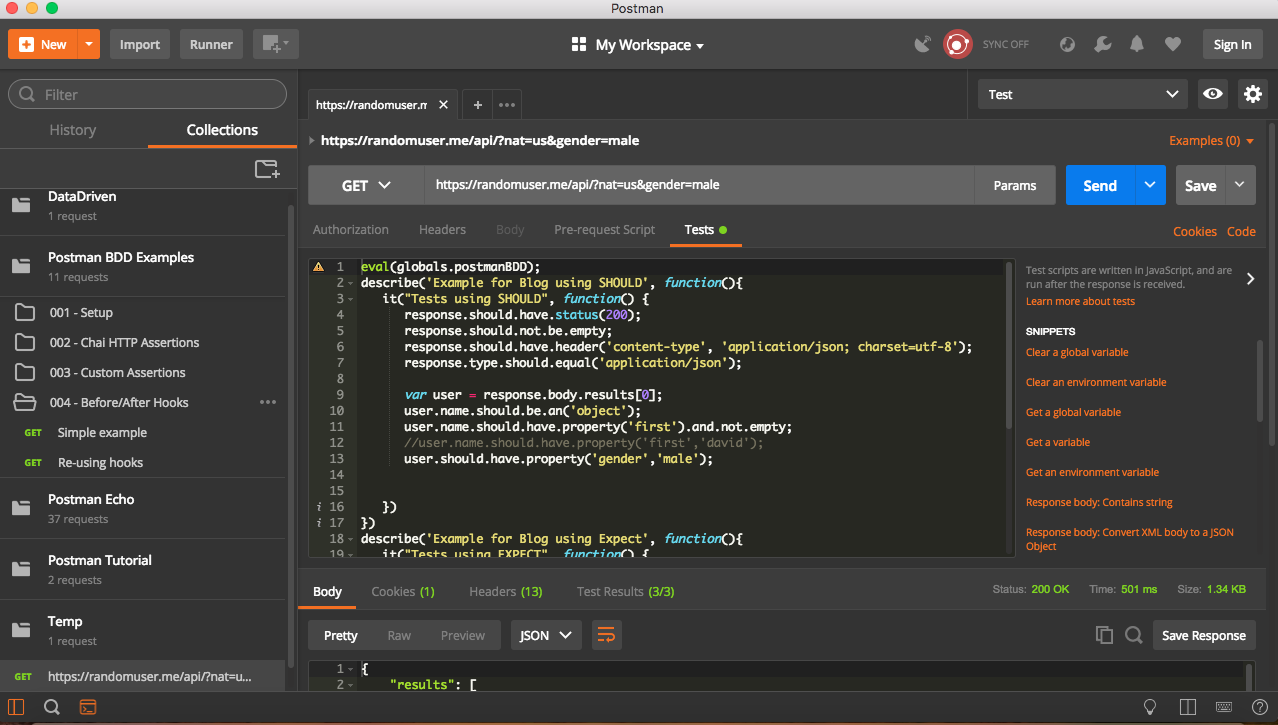
Writing Tests in Postman
In previous blog post, we saw how to use BDD format for writing test cases in postman. Most important part of writing tests in postman is understanding various features available. Let us explore various options available . The examples specified in postman documentation, have lot of information about how to setup postman bdd, use chai http assertions, create custom assertions and use before and after hooks. Please import them into postman and try that by yourself to familiarise with postman BDD. Below is only few examples from them.
Postman BDD makes use of Chai Assertion Library and Chai-Http. We have access to both libray and postman scripting environment for writing test cases. Chai has two types of assertion styles.
Expect/shouldfor BDDAssertfor TDD
Both styles support chainable language to construct assertions. We can use both of them to write postman test assertions. If you need details of all chainable constructs, please refer to their documentation. Major ones which we may use in postman tests are
Chains
  to
  be
  been
  is
  that
  which
  and
  has
  have
  with
  at
  of
  same
  but
  does
Not - Negates all conditions
- any -
- all -
- inlcude
- OK
- true
- false
- null
- undefined
- exist
- empty
- match(re[, msg])
Chai-Http module provide various assertions. Read through their documentation here to know details. Below are main commands at our disposal for validation .
- .status(code)
- .header (key[, value])
- .headers
- .ip
- .json / .text / .html
- .redirect
- .param
- .cookie
Postman bdd provide response object on which we do most of assertions. It will have all information like response.text, response.body, response.status, response.ok , response.error. Postman BDD will automatically parse JSON and XML responses and hence there is no need to call JSON.parse() or xml2json(). response.text will have unparsed content. It also have automatic error handling , which will allow to continue with other test even if something fails.
Examples for various assertions done on response object are below
1 2 3 4 5 6 7 8 9 10 11 12 13 14 15 16 17 18 19 20 21 22 23 24 25 | |
If we use above assertions in proper BDD format, it will look like below
1 2 3 4 5 6 7 8 9 10 11 12 13 14 15 16 17 18 19 20 21 22 23 24 25 26 27 28 29 30 | |
Postman BDD
In Previous blog post,we discussed about how to use postman and how to use collections using newman and data file. If you haven’t read that , please have a read through first .
In previous examples, we discussed about writing tests/assertions in postman. We followed normal Javascript syntax for writing test cases including asserting various factors of response ( like content , status code etc). Eventhough this is a straightforward way of writing, many people would like to use existing javascript test library like Mocha. They can use postman - bdd libraries.
Let us take a deep dive into how to use setup postman bdd.
Note: It is assumed that user already have postman and newman installed on their machine along with their dependencies.
Installing Postman BDD
Installation is done triggering a Get request and setting the response as Global environment variable.
- Create a GET request to
http://bigstickcarpet.com/postman-bdd/dist/postman-bdd.js - Set Global environment variable by using below command in test tab.
postman.setGlobalVariable('postmanBDD', responseBody);
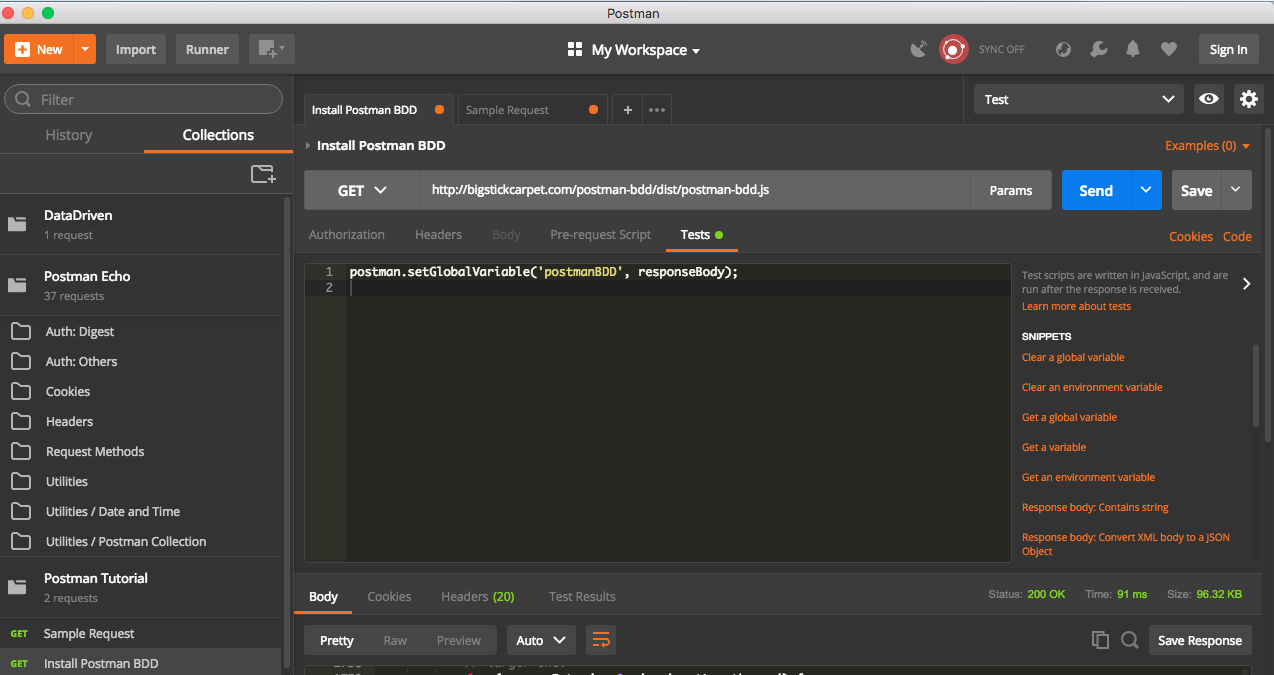
Once we trigger above get request, postman bdd will be available for use. We can make use of postman BDD features by below command
eval(globals.postmanBDD);
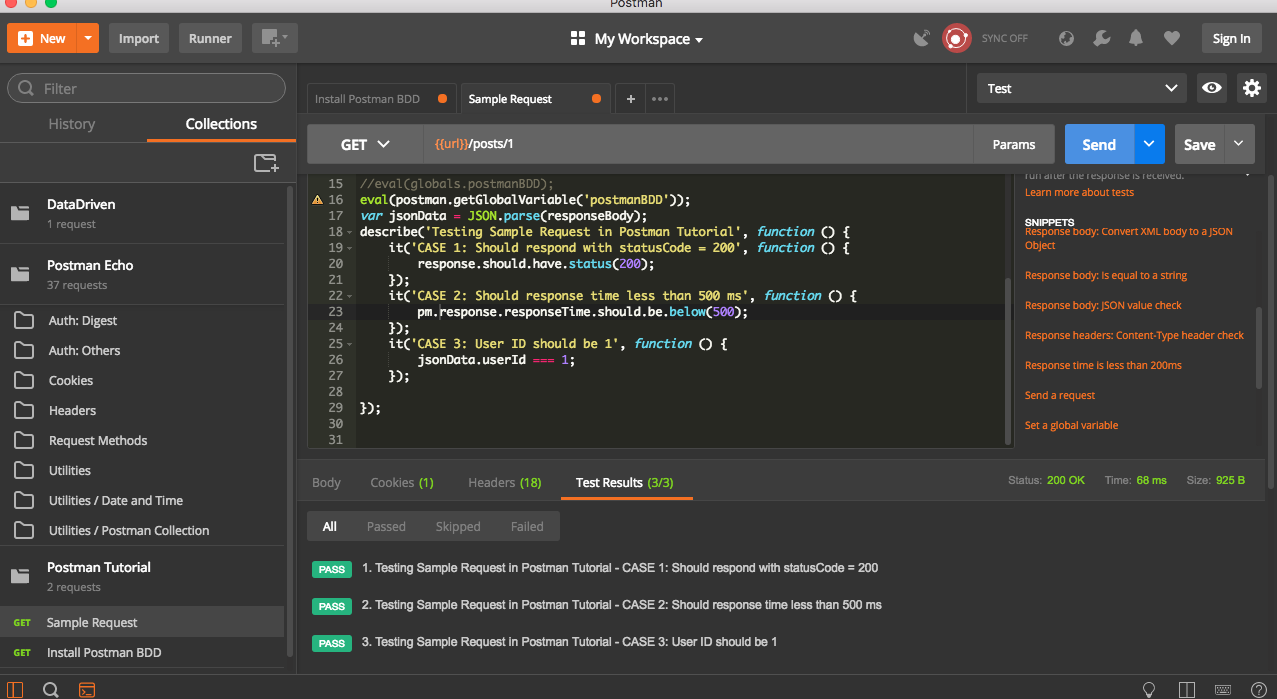
Writing Tests
Postman bdd library provide us with flexibility to write tests and assertions using fluent asserts and have best features of Chai and Mocha. Inorder to demonstrate this, I am using sample Tutorial given with postman client.
Open up the sample Request in Postman Tutorial folder under collections. It will already have some test predefined in Test tab. Remove them and add below test to it.
1 2 3 4 5 6 7 8 9 10 11 12 13 14 15 | |
Note: You can find more details of various type of asserts in http://www.chaijs.com/api/bdd/
Once it is done, trigger the request
 .
.
Gulp Task for Running Automated Test
Gulp is a toolkit for automating painful or time-consuming task in your development workflow, so you can stop messing around and build something. Gulp can be used for creating a simple task to run automated test cases.
Firstly, we will create package.json file for this project. This can be done by below command from project folder. It will prompt you to enter a list of information required for creating package.json file
npm init
Once this is done, install gulp. It can be done by below command. This will add gulp as a dev dependency.
npm install --save-dev gulp-install
In order to run acceptance test cases, we will need to install nunit/xunit test runners. It can be done by below command from the root folder.
npm install --save-dev gulp-nunit-runner
        OR
npm install --save-dev gulp-xunit-runner
Detailed usage of above test runners are available here.
Once above are installed, we need to create gulpfile.js inside root folder. This file will have details of various gulp tasks
Sample Usage of test runner is below. Insert this code into gulpfile.js
1 2 3 4 5 6 7 8 9 10 11 12 13 | |
- {read: false} means, it will read only file names and not the entire file.
- Executable is the path to nunit console runner, which should be available.
- gulp.src is that path to acceptance test solution dll. Since we use wild character, we may have to modify this path to reflect the exact path of dll.( something like ./**/Debug/Project.acceptancetest.dll)
Once we have above in gulpfile.js, it can be run by below command
gulp unit-test
Out of above command will be something like
C:/nunit/bin/nunit-console.exe "C:\full\path\to\Database.Test.dll" "C:\full\path\to\Services.Test.dll"
Note: If it complains about assembly missing, it means path to acceptance test solution is incorrect . Retry after fixing the path.
Gulp Nunit runner provide lot options to configure test run, like selecting test cases based on category, creating output files etc. Detailed options can be found here.
Below is an example with few options
1 2 3 4 5 6 7 8 9 10 11 12 13 14 15 16 | |
- Where - Selects the category which needs to be run
- Work - Create a folder with specified path/name for output files
- result - create test results in xml
- config - select the config which needs to be run
If we run gulp unit-test now, it will execute only the test cases having category test. It will create a folder named TestResultsFolder and will have an xml report of the test run inside it . The folder will be created in root where we have gulpfile.js.