Extracting Substring Using Javascript
In previous blogs here , I have explained how we return a XML response using mountebank. However , most of the time, we will have to make some modification to the template response before returning a response. Say for example, we may have to replace details like timestamp, or use an input from request parameter and update that in response etc.
One of the easiest way to do this without using other frameworks like xml2js etc is to extract the substring between the node values and replace it . Below is a code snippet which will help to achieve this
The sample xml which we need to return is
1 2 | |
In above example, assume that we need to replace the inserted record value every time based on the request coming through . We can do that by below
1 2 3 4 5 6 7 8 9 10 11 12 13 14 15 16 17 18 19 20 21 | |
Predicates in Mountebank
Predicates in Mountebank imposter files is a pretty powerful way to configure stubs. It helps us to return different responses based on the request parameters like type, query string , headers, body etc. Let us have some quick look at extracting values from request
Based on Query String
Below is an example of extracting the records based on query string.
If the request is like path?customerId=123&customerId=456&email=abc.com
Note: This is slightly modified version of code in mbtest.org
1 2 3 4 5 6 7 8 9 10 11 12 13 14 15 16 17 18 19 20 21 22 23 24 25 26 27 28 29 30 31 32 33 | |
Based on Header Content
If input data is shared through values in header, that can be extracted. Below snippet is directly from mbtest.org
1 2 3 4 5 6 7 8 9 10 11 12 13 14 15 16 17 18 19 20 21 22 23 24 25 26 27 28 29 | |
Galen Framework - Getting Started
In previous post, I mentioned that we can use Galen for automated lay out testing. Galen offers a simple solution to test location of objects relative to each other on the page. Galen is implemented using Selenium Web driver. Hence we can use it for normal functional automation testing as well.
Documentation of Galen
- Galen has its own domain specific language to define Specs. Detailed documentation can be found here.
- Galen has its own javascript API which provides a list of functions which make writing test cases easier. Detailed documentation can be found here.
- Galen pages javascript API is light weight javascript test framework. Details are available here.
- Details of galen test suite syntax are here.
- Galen framework has a detailed documentation of its usage and functions here.
Installation
Below are high-level steps to help you get started.
- Ensure Java is installed. Galen needs Java version above 1.8
- Download binary from http://galenframework.com/download/
- Extract the zip file
- Add the location of extracted files to PATH environment variables. A detailed guide for older versions of Windows is available here.
- Alternatively, on Windows , you can create a bat file to run Galen by changing Path on the fly. Details are in below steps.
Setting up Galen Framework
There are different framework available for testing responsive design based on Galen. Galen bootstrap is one of such framework which can be reused.
- Download and extract the project from Github. Keep relevant files only. You can remove
- Create an
init.jsfile to loadgalen-bootstrap/galen-bootstrap.jsscript and configure all devices and a website URL for testing. URL mentioned below is an example of responsive web design template.
1 2 3 4 5 | |
Note: Uncomment the lines above. Octopress blog engine was throwing error when it tries generate post.
- Run
galen configfrom the command line with the project directory. This will create Galen config file in the location where the command is run.

- Modify galen.config file to make chrome as default browser and add path to chrome driver. There are other useful configs like range approximation, screenshot, selenium grid etc in the config.
1 2 | |
- Create a folder named
Testfor keeping test cases and create test filesexample.test.js. Copy below content toexample.test.js. Make sure to update the relative location of the init.js file created in previous steps. Below content loads init.js file which lists out website URL, device sizes that need to be tested.It then calls a function to test on all devices. Check layout is one of the available javascript API function.
1 2 3 4 | |
- Create a folder named
specsand create a spec file namedhomepage.gspec. We need to update the specs with layout checks . Below is the sample spec for checking image and section intro for the sample URL from init.js. First section defines the objects and its identifier. Second section says that on desktop, image will on left side of section intro and on mobile and tablet, it will be above section intro
1 2 3 4 5 6 7 8 9 10 11 | |
- Now create a bat file in the main folder to run the galen test cases. Make sure to give relative paths to test file, configs, reports correctly. Modify Path variable to include path location to galen bin. This is not needed if we manually set pah while installing. However, I prefer to have galen bin files as well in source control and point the path to that location so that we don’t have any specific dependency outside the project.
1 2 | |
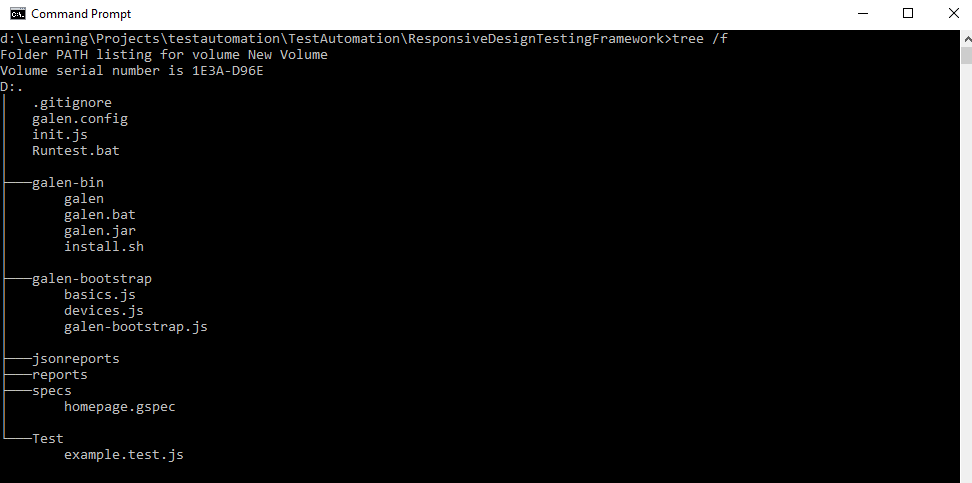
once all files are created, folder structure will look like below
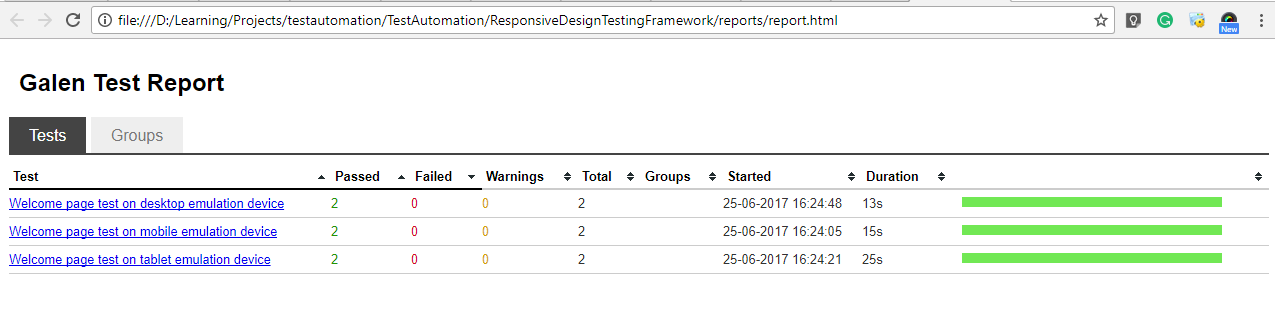
- run the bat file created above. This will ideally run example.test.js file which invokes chrome driver, navigate to the URl, resizes the browser and then check for the specs.It will list out the results in command prompt. Once it completes are all test execution, it creates both HTML report and JSON report in corresponding folder location mentioned in bat file. Below is a sample HTML report, which is self-explanatory.
Main report
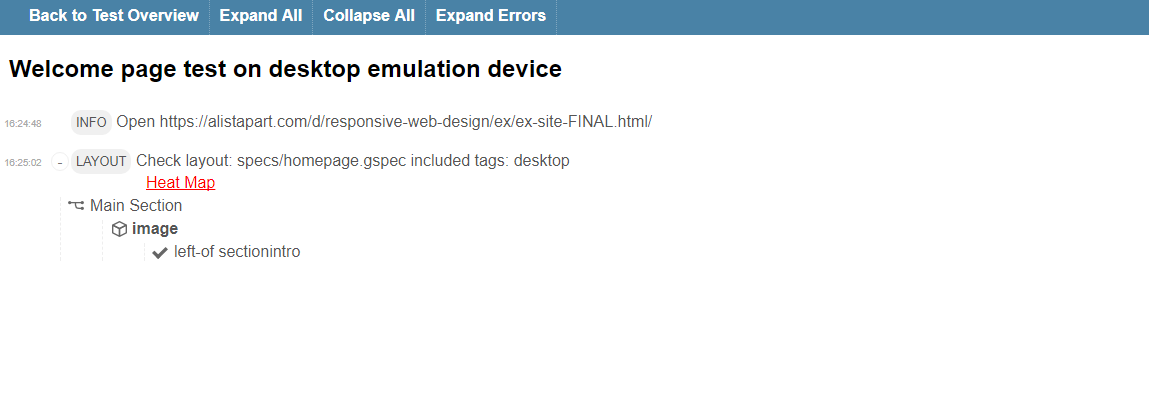
If we expand the result for desktop emulation, it will look like below.It will list down each assertion made and indicate whether it is passed or failed.
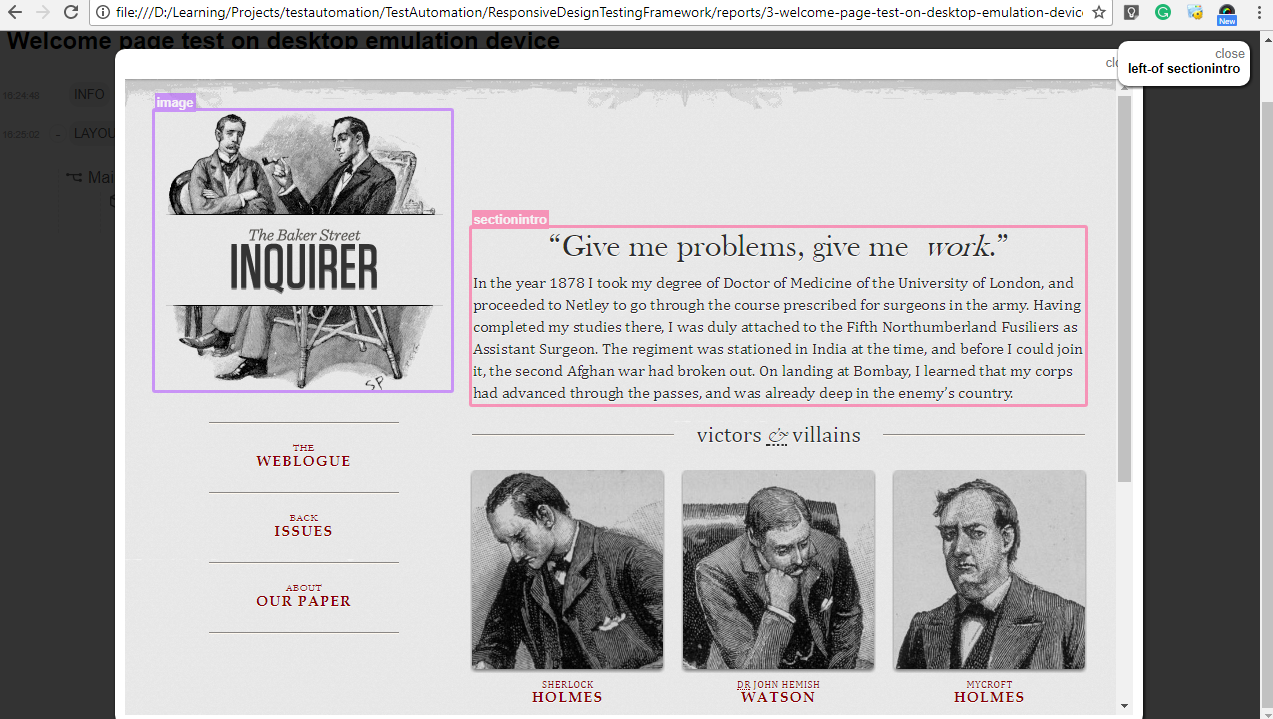
If we click on the assertion point, it will show the screenshot taken for that assertion by highlighting the objects which will help for easier verification. Below screenshot shows that image is on left side of section intro as defined in spec file.
Automated Testing of CSS for Responsive Web Design
In a world where mobile first seems to be the norm, testing of look and feel of websites on various mobile/tablet devices are essential. More businesses are now adopting Responsive Web designs for developing their web applications and sites.
What is Responsive Web Design
According to Wikipedia, Responsive web design (RWD) is an approach to web design aimed at allowing desktop webpages to be viewed in response to the size of the screen or web browser one is viewing with. In addition, it’s important to understand that Responsive Web Design tasks include offering the same support to a variety of devices for a single website. A site designed with RWD adapts the layout to the viewing environment by using fluid, proportion-based grids, flexible images, and CSS3 media queries, an extension of the @media rule, in the following ways:
- The fluid grid concept calls for page element sizing to be in relative units like percentages, rather than absolute units like pixels or points.
- Flexible images are also sized in relative units, so as to prevent them from displaying outside their containing element.
- Media queries allow the page to use different CSS style rules based on characteristics of the device the site is being displayed on, most commonly the width of the browser
How do we test responsiveness
An ideal option for testing is to test on different physical devices of various screen size. However, it is impossible to get hold of all available mobile/tablet devices in the market. Even if we prioritize the devices using analytics, it is very expensive to buy enough number of devices. Along with this, we need to upgrade to newer version of devices frequently when apple/google/Samsung releases an upgraded version.
Next possible option is to use device emulators like device mode in Chrome dev tools. As pointed out in their documentation, it is only a close approximation of how the website will look on a mobile device.It have its own limitations which are listed here
Best approach will be to use emulators early in development cycle and once UX design is stabilized, then test it on physical device based on priority obtained by analytics.
Challenges in testing Responsive Websites
Testing of responsive websites has its own challenges.
- Number of Options to be tested or number of breakpoints which needs to be validated are high
Distinctive UI designs for different device screen sizes makes testing time consuming. This adds complexity to testing since it will require testing of below in various screen sizes
- All UI elements like image, text, controls are aligned properly with each other and doesn’t overflow from screen display area
- Consistency in font size, color, shades , padding, display orientation etc
- Resizing of controls which take inputs (like text) to cater for long content typed in by users.
- Other CSS validation specific for mobile and tablet devices
It is hard to test all of the above on every iteration manually.
- Comparing UI & UX & Visual design will require more efforts.
- Hard to keep track of every feature that needs to be tested and will have testing fatigue which will result in Non-obvious changes to UI
Automated Responsive Design testing - Galen Framework
As mentioned above, one of the pain points in responsive design testing is the user fatigue happening over multiple iterations of testing. This can be easily avoided by having an automated test framework. I recently came across galen framework which is an open source framework to test layouts of webpages. You can read about Galen framework here. Galen framework can be used for automation of CSS testing easier. It has evolved over time and has its own Domain specific language and commands which can be used for CSS testing. I will go through galen framework in more details in next post
How to Squash Commits in Git
Very often we will be committing smaller pieces of work in our local machine as we go. However before we push them to a centralized repository, we may have to combine these small commits to single large commit, which makes sense for rest of the team. I will explain how this can be achieved by using interactive rebasing.
To start with, let us assume the initial commits history look like below. It have 4 minor commits done to the same file.

Now we need to squash last for commits into a single commit. The command required for that is as below. This tells git to rebase head with previous 4 commits in an interactive mode.
$ git rebase -i HEAD~4
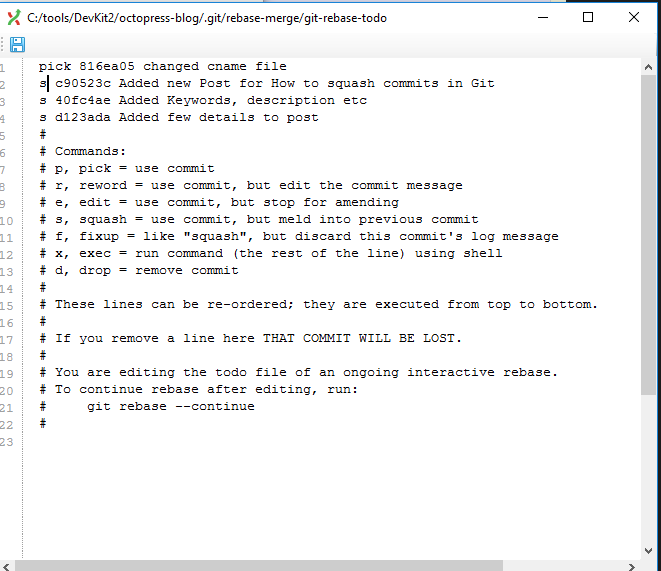
This will pop up another editor with details of last 4 commits and some description about possible actions on this. Initially, all of them will have a default value of PICK. Since we are trying to squash commits together, we can select one of the commits as PICK and rest all needs to be changed as SQUASH. Save and close the editor once all changes are made.
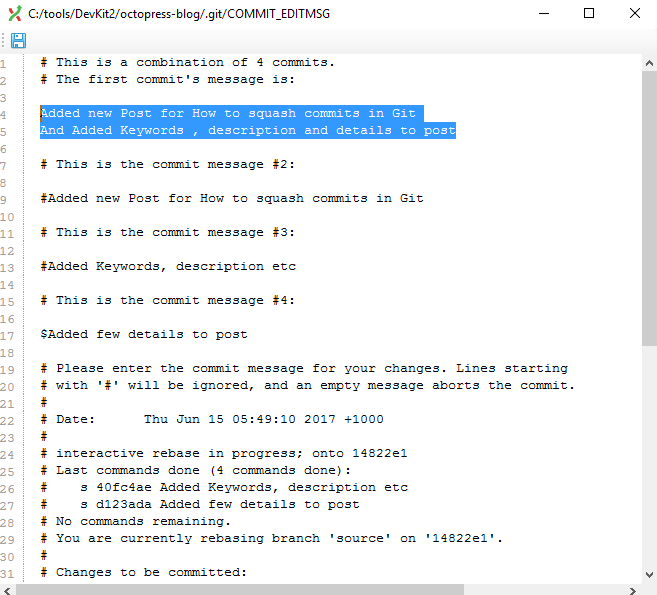
After this, another popup will appear with comments given for each of the commits. We can comment out unnecessary comments by using # and also modify required comments as we need. In below screen, I have modified comments for the first commit and commented out rest all. Save and close the editor once all changes are made.
Now Git will continue rebasing and it will squash all commits as selected in the previous step.

If we look at commit history, we can see that commits are now squashed to single commit.

Migrating to Octopress
Over the past weekend, I noticed that my blog is not available since azure has disabled hosting of my WordPress blog. It happened because I ran out of my free credits for the current month. I started looking for alternate options for hosting WordPress. That’s when I came across (Static Generator is All a Blog Needs - Moving to Octopress). I decided to give it a try.
Below are the main steps which I followed for migrating to Octopress
Documentation
Setup
- Install Chocolatey as mentioned in documentation here Below command can be run on cmd.exe open as administrator
1
| |
- As mentioned in octopress documentation, ensure Git, ruby and devkit are installed. Cholocatey way of installation can be found in git, ruby , devkit. Below commands can be run on cmd.exe
1 2 3 | |
- By default, devkit is installed in
C:\tools\. Move indevkitfolder and run below commands
1 2 3 | |
Install Octopress
- Now install Octopress as per documentation
1 2 3 4 | |
Install Octostrap3 theme & Customize
- Since I didn’t like the default theme much, I installed Octostrap3 theme as mentioned here
1 2 | |
- Fix up all issues. The date displayed as “Ordinal” can be fixed by updating
_config.ymlfile as mentioned in their blog. Below is the config which I used
1
| |
- I made few more changes for changing the navigation header color, color of code blocks and also to include a side bar with categories. The changes are as below
Changing color of code blocks is done by commenting below line in octopress\sass\custom\_colors.scss
1
| |
Navigation header color is changed by adding below to octopress\sass\custom\_styles.scss
1 2 3 4 5 6 7 8 9 | |
Adding category side bar is done by following steps mentioned in Category List Aside
Google Analytics Integration
Next step was google analytics integration. Detailed steps for this is available on various blogs. Below is what I followed
- Sign up for google analytics ID in here
- Update _config.yml with google analytics ID
1 2 | |
- Update
google_analytics.htmlfile with below
1 2 3 4 5 6 7 8 9 10 | |
- UA-XXXXXXXX-1 can be replaced with
site.google_analytics_tracking_idenclosed in double braces/curly brackets - Log in to Google Analytics site and navigate to Admin >> View >> Filters
- Add a new filter to exclude all traffice to hostname “localhost”. This will help to exclude all site visit done for development/ preview purpose.
Sample Post
- Now create a Hello World post and check how it look
1 2 3 | |
rake preview mounts a webserver at http://localhost:4000. By opening a browser window and navigating to http://localhost:4000 will preview the Hello World Post
Deploying to GitHub Pages
Detailed instructions can be found in Deploying to Github Pages. Below are high-level steps copied from there
- Create a GitHub repository with name yourusername.github.io
- Run below command. It will prompt for GitHub URL, which needs to be filled in
1 2 3 | |
- Now we can commit the source
1 2 3 | |
Custom Domain
- Create a file named
CNAMEin blog source - Update it with custom domain name. It has to be a sub domain (www.examplesubdomain.com)
- Update the CNAME dns setting in your domain provider to point to
https://username.github.io - If top-level domains (exampletopdomain.com) are needed, then configure A record to point to IP address
192.30.252.153or192.30.252.154.
Migrating Old blog Post from word press
After completing above steps, a new octopress blog is ready to go . Below are the steps which I followed to migrate old blog posts from word press.
- Clone Exitwp
Follow the steps mentioned in readme.md.
- Export old wordpress blog using WordPress exporter in tools/export in WordPress admin
- Copy xml file to wordpress-xml directory
- Run python exitwp.py in the console from the same directory of unzipped archive
- All blogs will be created as separate directory under
builddirectory - Copy relevant folders to source folder of the blog
Find broken redirection links and fix
- The redirection links are now changed to something like
{site.root}blog/2017/04/07/mountebank-creating-a-response-based-on-a-file-template-and-modifying-it-based-on-request-part-1/
- The redirection links are now changed to something like
- Find broken image links and fix
- Inorder to make it easier for migrating to another platform later, I created a new config value in
_config.ymlas below .images_dir: /images - The image links are not pointing to
{site.images_dir}/2017/04/27/Mountebank_XML_Response_Folder-Tree.jpg
- Inorder to make it easier for migrating to another platform later, I created a new config value in
SEO Optimisation in Octopress
- In rake file, add below two lines
post.puts "keywords: "andpost.puts "description: " - Final content will look like below
1 2 3 4 5 6 7 8 9 | |
- Add relevant Keyword and description to all pages
Powershell - Remove Entire Directory and It's Content
The PowerShell command to remove an entire directory and its contents ( including sub folders and files) is below
1
| |
R flag denotes to run “rm” command recursively . “f” flag denotes to run in forcefully. We can even replace “f” with “v” for verbose mode and “i” for interactive mode.
Note: Above command can also be used to delete files which have long path ( more than 260 characters)
Stubbing XML Responses Using Mountebank
Previous two blog post talked about how we can use mountebank for stubbing where responses are in json format . They can be accessed (here) and (here). We can use same approach for stubbing SOAP services using XML as well. In this post, I will explain how we can provide XML response using Mountebank .
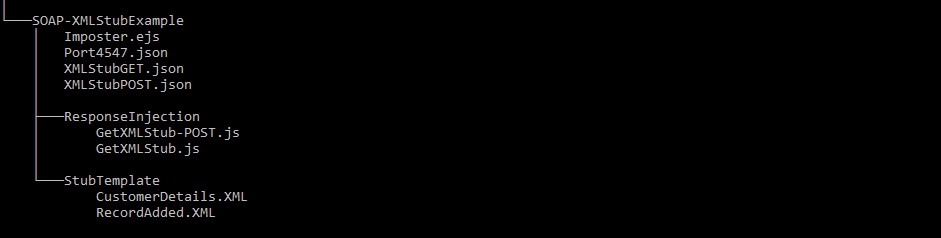
Let us have a quick look into the files created. Before we begin, folder structure of various file as below
Imposter.ejs
The main Imposter file is
1 2 3 4 5 | |
Port4547.json
This file specifies which port number to use and what all stubs needs to be created is as below
1 2 3 4 5 6 7 8 9 10 11 12 | |
XMLStubGET.json
This is the first stub for this example and it looks for any request coming with the method “GET” and path “/Blog.Api/[0-9]+/CustomerView” , where [0-9]+ is regular expression of any numeric
1 2 3 4 5 6 7 8 9 10 11 12 13 | |
XMLStubPOST.json
This is the second stub for this example and it looks for any request coming with method “POST” and path “/Blog.Api/XMLexamplePOST/[0-9]+” , where [0-9]+ is regular expression of any numeric .It also needs a body as
Note: If you have body in multi-line, then make sure to enter “\n” for new line
1 2 3 4 5 6 7 8 9 10 11 12 13 14 | |
GetXMLStub.js
Below js file create a response based on template mentioned and return the response with proper status. Please note that, we are not using “Json.Parse” here as we did for previous examples involving json.
1 2 3 4 5 6 7 8 9 10 | |
GetXMLStub-POST.js
1 2 3 4 5 6 7 8 9 10 | |
CustomerDetails.XML
This is the template for the first stub - GET example
1 2 3 4 5 6 | |
RecordAdded.xml
This is the template for the second stub - POST example
1 2 | |
After creating above files and keeping them as per directory structure is shown above, it is time to start mountebank
mb –configfile SOAP-XMLStubExample/Imposter.ejs –allowInjection
Note: Give the right path to Imposter.ejs . If you need to debug Mountebank, you can use below command at the end “ –loglevel debug”
Now trigger a get request to http://localhost:4547/Blog.Api/3123/CustomerView.
This should match with our first predicate and should return the response mentioned
Mountebank_XML_Response_
Now trigger a POST request with a body . If predicates are matched, then it will respond with expected response as below
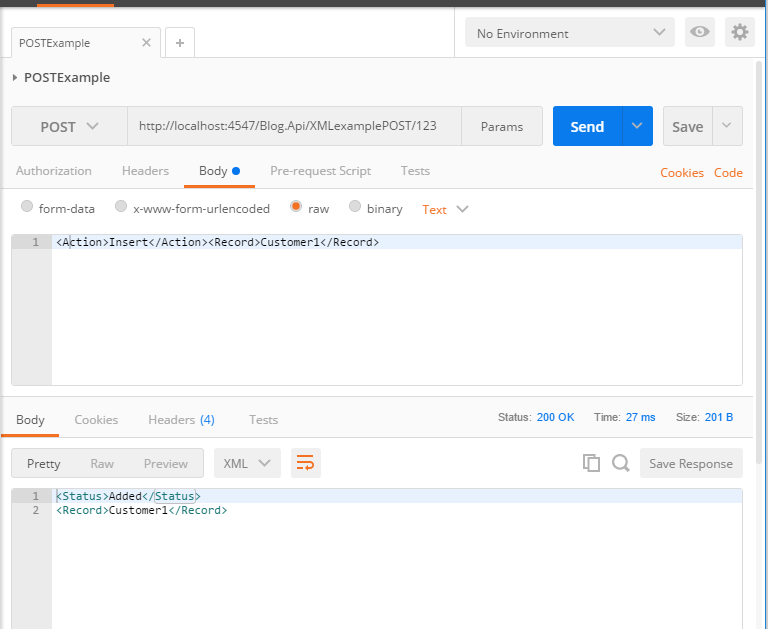
In Nut shell, creating a XML response is similar to creating json response. There are only minor differences in the js file which creates the response. The main difference is the omission of Json.Parse and also changing the response headers.
Above examples can be cloned from my GitHub repository here. After cloning the repository to local, just run RunMounteBankStubsWithSOAPXMLStubExampleData.bat file. Postman scripts can also be found inside PostmanCollections Folder to testing this
Zip and Extract Zip Files Using Csharp
On corporate world, most of the times, the access required for installing applications and connecting to internet will be limited. There can be scenarios where access to install Mountebank using npm will not be available. In those circumstances, we can just unzip the zip file downloaded from self contained archive links in mbtest.org
Below code snippet can be used for extracting the zip files on the fly , so that it can be used for running test cases on any machine.
Pre-Requisite
- .Net 4.5 is needed
- Add reference to below dll to solution
- System.IO.Compression.dll
- System.IO.Compression.FileSystem.dll
Example
Below example is based on (copied from) msdn
1 2 3 4 5 6 7 8 9 10 11 12 13 14 15 16 17 | |
Mountebank - Creating a Response Based on a File Template and Modifying It Based on Request - PART 2
This is an extension to my previous blog about how we can use mountebank to create a stubbed response based on a template file . You can read about it here. In this step by step example, I will explain how we will use mountebank to modify the response based on the request . Before we start, please ensure you are familiar with Part1 of the excercise. If you need to know more about mountebank and how to use mountebank , please read through how to install mountebank and service virtualisation using mountebank.
As in previous example, let us create Imposter.ejs and 4547.json . Contents of the Imposter.ejs is as below
1 2 3 4 5 6 7 8 | |
Contents of 4547.json is as below
4547.json
1 2 3 4 5 6 7 8 9 10 11 12 13 14 | |
Now create CustomerFound.json
1 2 3 4 5 6 7 8 9 10 11 12 13 14 15 | |
As we can see from above, if there is request which matches the predicates , then response will be dictated by the GetCustomerFound javascript file kept inside directory ResponseInjection. Predicate used here is a GET request which have a matching path of /Blog.Api/[0-9]+/CustomerView.
Contents of GetCustomerFound.js is
1 2 3 4 5 6 7 8 9 10 11 12 13 14 15 16 17 18 | |
The javascript file have a single function , which reads the stubbed response kept in template file . Then it calls another Javascript function to called “extractrequest”. We will see the details of it soon. For now, it actually returns the customer number from the request . For eg, if request is “http://localhost:4547/Blog.Api/3123/CustomerView ” then it return 3123 as customer ID. Once we extract the customer ID, then it will replace the customer ID in our template response with the value coming from request and return the response.
Let us take a close look at the extractrequest function.
1 2 3 4 5 6 7 8 9 10 11 12 | |
This method will take the input parameter as the request and split it at “/” to get a an array . Then we will return the array[2] which is the customer ID from the request
Finally , the template response
CustomerFoundView.json
1 2 3 4 5 6 7 8 9 10 11 12 13 14 15 16 | |
Now let us fire up mountebank

Make few request using postman, which have different request parameter

Another request

In above two examples,we can see the CustomerID field is response is updated with number extracted from request.
Now let us try another example , where request is http://localhost:4547/Blog.Api/1234542323/CustomerView
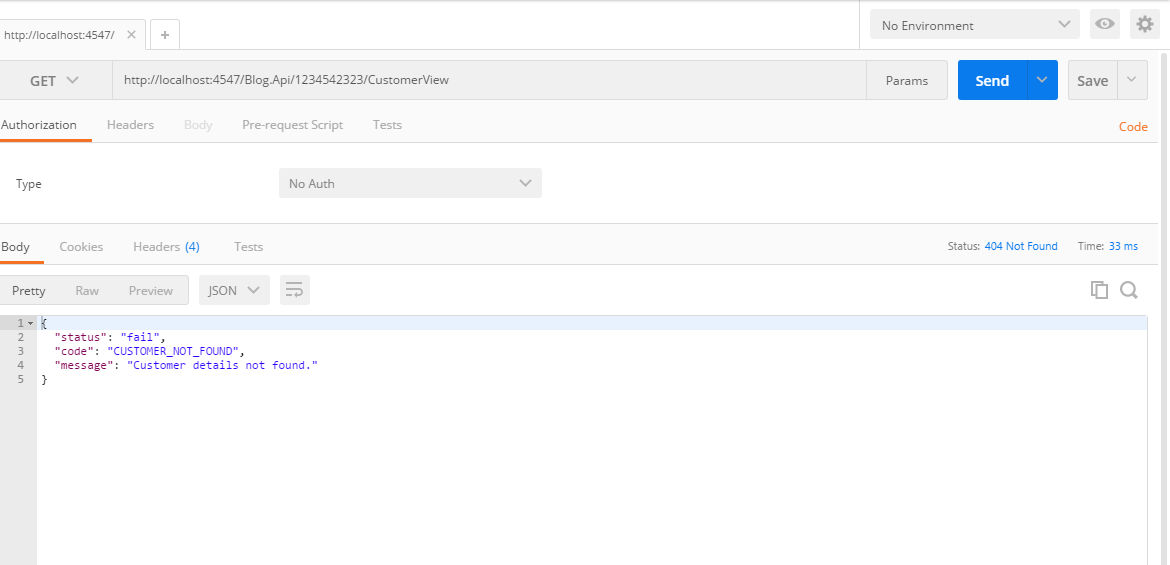
As you can see, we are getting a customer Not found response. This is due to the order of predicates we use. In our 4547.json, the order of response are as below.
Customer Not found which has a predicate of “/Blog.Api/1[0-9]+/CustomerView”
Customer found which has a predicate of “/Blog.Api/[0-9]+/CustomerView”
As you can see from above order, when a request comes through , mountebank will first match with predicate of first response and if it matches, it returns the response. If not, mountebank will keep trying with next one followed by all others. In this particular example, since our request have a customer ID of 1234542323, it matches with regular expression of first one ( 1[0-9]+) and hence it return customer not found response.
In next blog post, I will provide more insights about how to extract request from different type of requests.